Week 2 - MVC and Activities
Corresponding Text
Android Programming, pp. 33-46, 57-71
Adding Functionality
Now that we have a simple app that allows us to quiz a user, we'd like to expand it beyond a single question. We'd like to have a collection of questions we can present to the user. The first step to doing this is to create a new class to represent questions - we'll name it Question. With each question we'll associate question text, four possible answers, and a value indicating the correct answer. The question text and possible answers will be stored as a string array resource, which we'll look at later, so we'll store the ID associated with the string array resource. Our code for the Question class looks like this:
public class Question {
    private int mQuestionResId;
    private int mCorrectAnswer;

    public Question(int questionResId, int correctAnswer) {
        mQuestionResId = questionResId;
        mCorrectAnswer = correctAnswer;
    }

}
Notice that instance variables are prefixed with the letter m. By convention
in Android, instance fields are prefixed with the letter m and class or
static fields are prefixed with the letter s. While fields have these
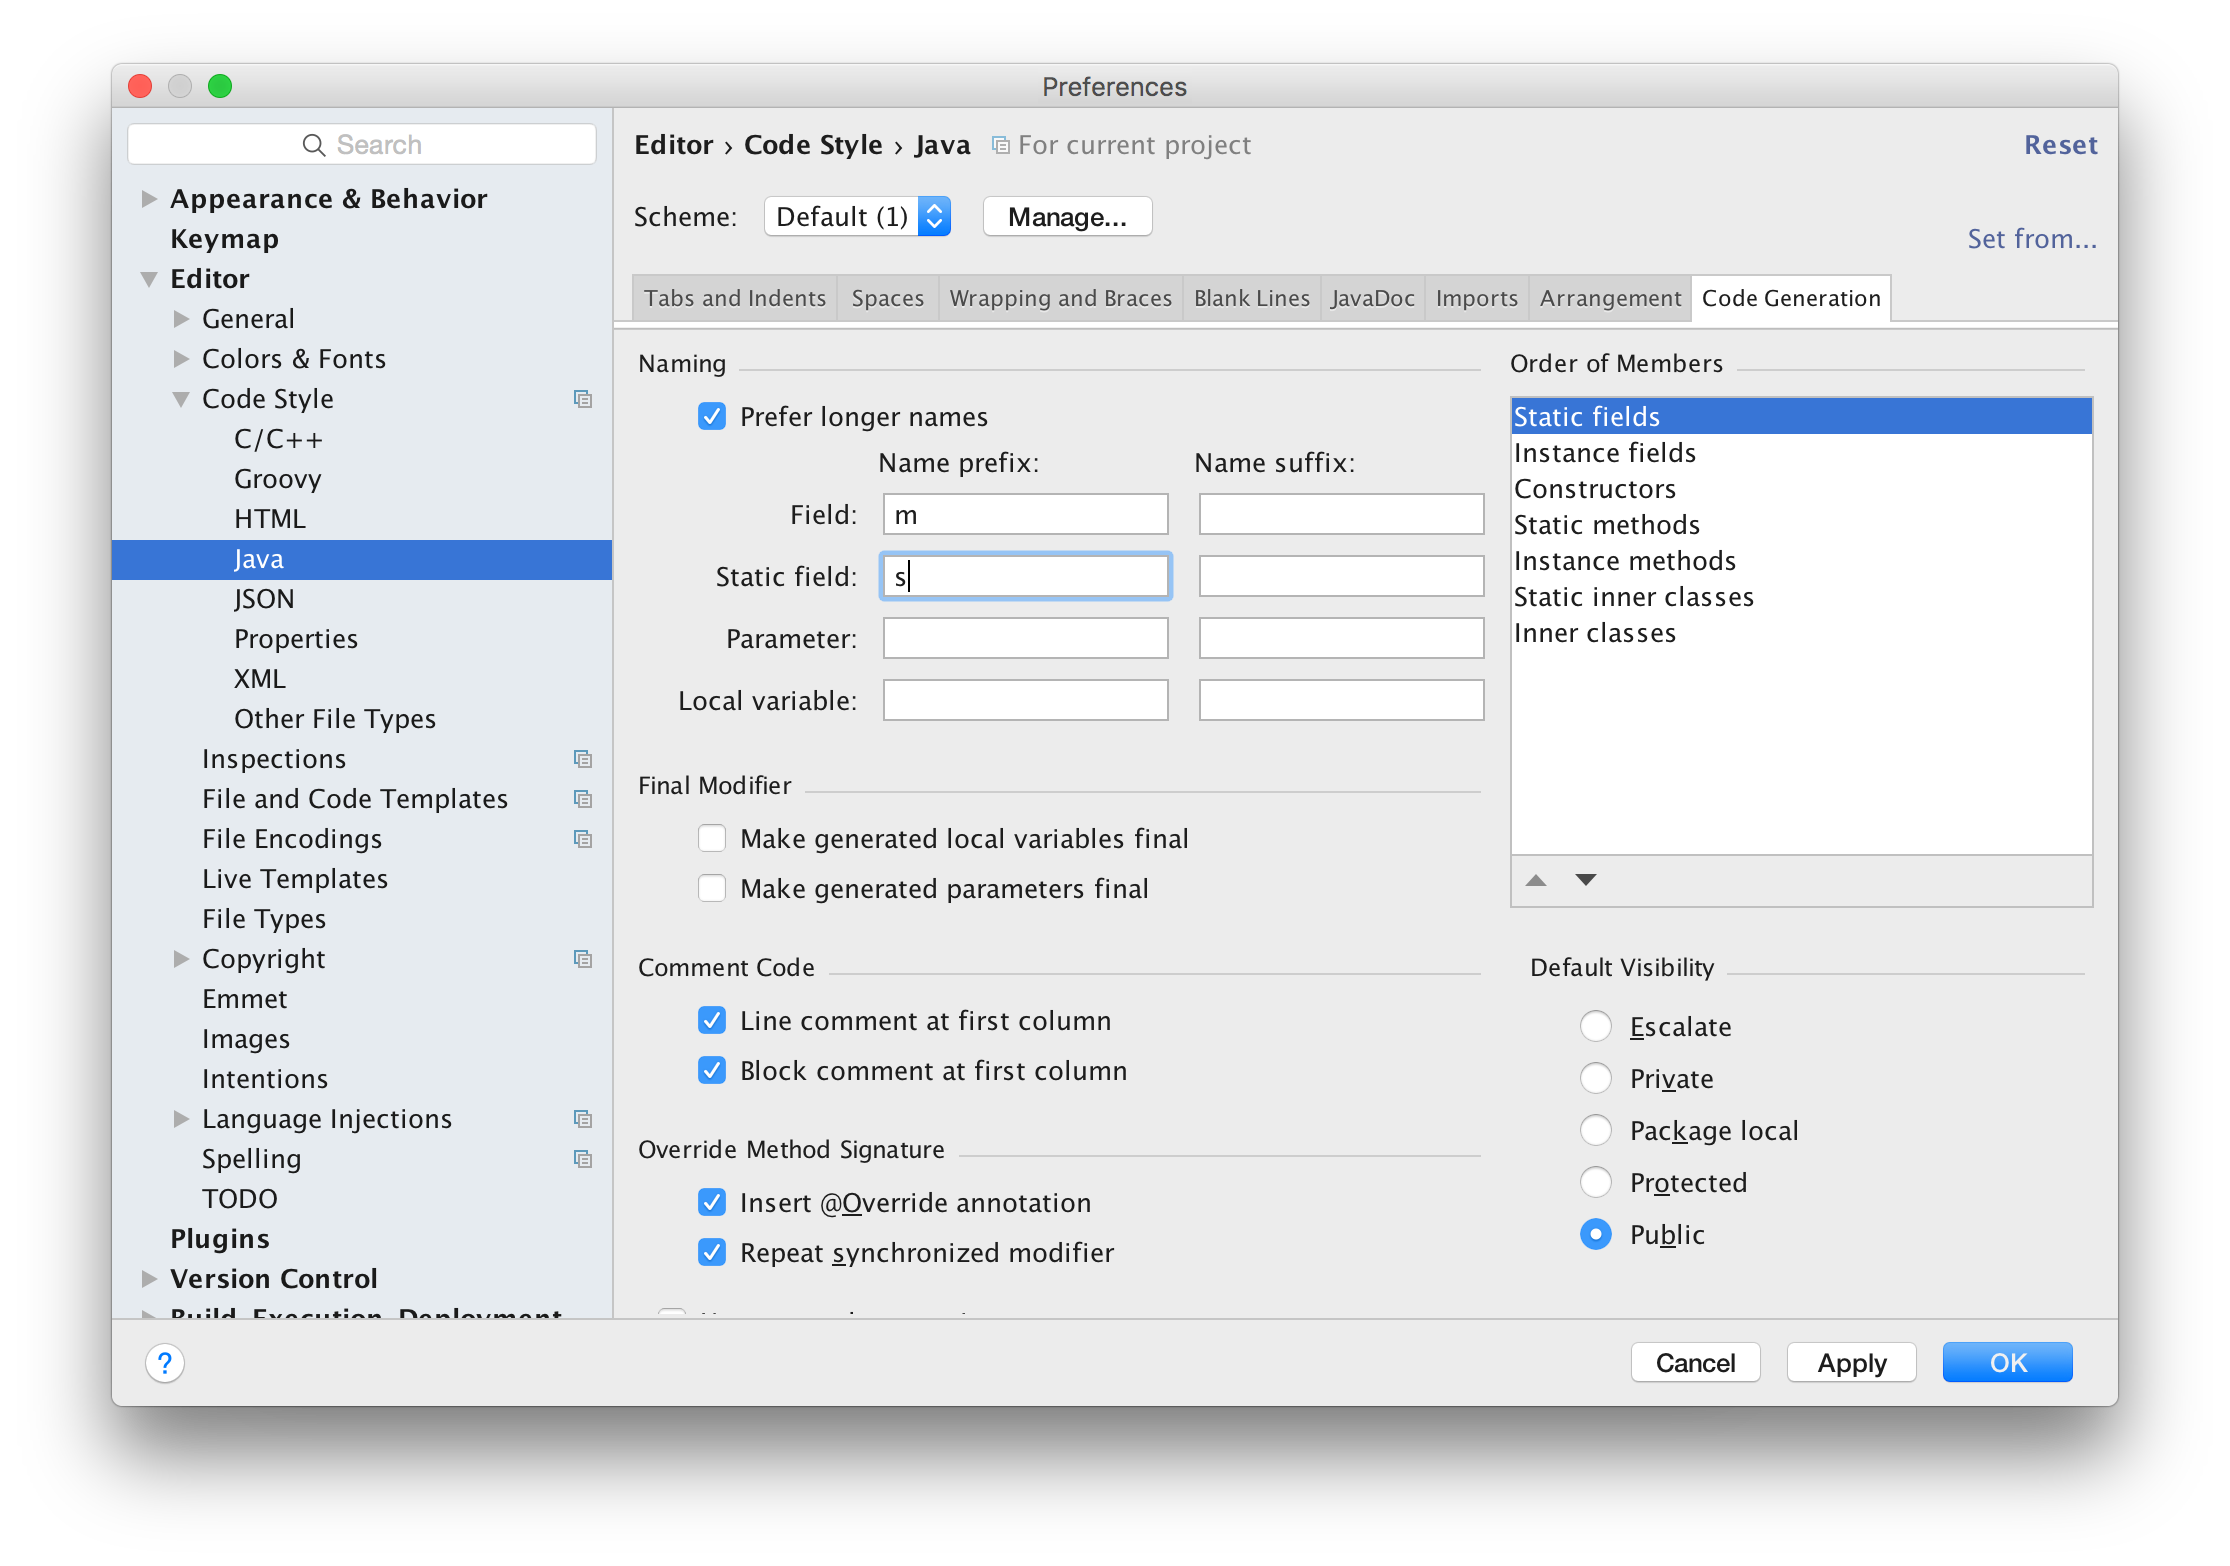
prefixes, getters and setters do not. If we want to automatically generate
getters and setters with Android Studio, we can configure it expect ms and
ss prefixed to field names. To do this select Editor -> Code Style ->
Java in Android Studio's preferences window, select the Code Completion
tab, and type s and m in the Name prefix column and Field and
Static Fields, respectively.
We can use Android Studio to generate getters for our fields. Having set the code style prevents Android from generating a method name like getMQuestionResId. To generate getters for our fields, right click within the class body and select Generate followed by Getter.
Now that we've created a Question class to represent each of the questions our app will present to the user, we'll need to modify QuizActivity to make use of it. QuizActivity will rely on a collection of Question instances that represent question data to determine what is displayed. Similarly, QuestionActivity will be responsible for handling events that generated by the interface to determine if a user has chosen a correct answer and to display a new question. This separation of the data from the interface with an intermediary is often referred to as the Model-View-Controller pattern.
Model-View-Controller
In the Model-View-Controller pattern, or MVC, objects in a program are a model object, a view object, or a controller object. A model object represents the application's data and data-specific code or "business logic". A model object should have no knowledge of the user interface. Collectively, an application's model objects make up the model layer.
A view object represents everything a user interacts with such as
a TextView or a Button object. The view layer consists of all an
applications view objects. In our app, the view layers consists of the
the widgets inflated from activity_quiz.xml.
Controller object tie view and model objects together, controlling the flow of data between them. The controller layer is the collection of controller objects. Because the code associated with controller objects is often application-specific, it described as containing the "application logic". The QuizActivity class represents the TriviaQuiz controller layer.
Using MVC makes it easier to design and keep track of parts of an application. We often use classes to group related methods and data; similarly, we can group similar objects into the model, view, and controller layers based on their purpose. In addition to make it easier to understand the function of various components, separating model code from view code makes it's easier to reuse objects. For example, because the Question class knows nothing about how data is displayed on screen, it could be used to display a list of all questions. If Question were responsible for the interface as well as question data, we couldn't easily reuse it for different display elements.
Updating the View and Controller Layers
To accommodate multiple questions, we'll need to update the view layer.
Currently, we have a TextView and four Button objects with hard-coded text.
We'll want to programmatically change the text of these objects, so we can
clear the values of the text property for each of them. We'd also like to
give a more descriptive ID to the TextView object; change it to something like
question_text_view. We'll also add a new button that will allow us to move
to the next question. Before we add the new button, let's clean up the
interface a little bit. Let's add a GridLayout to the app by dragging and
dropping it below the exiting TextView. Once it's placed, set the following
properties:
| Property | Value |
|---|---|
| layout:width | wrap_content |
| layout:height | wrap_content |
| columnCount | 2 |
Next, in the Components Window, drag and drop each of the buttons into the
newly created GridLayout. Update the layout:width property to
wrap_content for each button.
Now, we can add a next button. Place it below the existing buttons in the GridLayout and set the following properties:
| Property | Value |
|---|---|
| layout:width | wrap_content |
| layout:columnSpan | 2 |
| id | next_button |
| text | @string/next_button |
We won't change the text of this button so it's okay for it to be hard-coded.
The XML for activity_quiz.xml should look similar to this:
<?xml version="1.0" encoding="utf-8"?>
<LinearLayout xmlns:android="http://schemas.android.com/apk/res/android"
    android:layout_width="match_parent"
    android:layout_height="match_parent"
    android:gravity="center"
    android:orientation="vertical" >

    <TextView
        android:layout_width="wrap_content"
        android:layout_height="wrap_content"
        android:id="@+id/question_text_view"
        android:layout_gravity="center_horizontal"
        android:padding="24dp" />

    <GridLayout
        android:layout_width="wrap_content"
        android:layout_height="wrap_content"
        android:layout_gravity="center_horizontal"
        android:columnCount="2">

        <Button
            android:layout_width="wrap_content"
            android:layout_height="wrap_content"
            android:id="@+id/option_1_button"
            android:layout_gravity="center_horizontal" />

        <Button
            android:layout_width="wrap_content"
            android:layout_height="wrap_content"
            android:id="@+id/option_2_button"
            android:layout_gravity="center_horizontal" />

        <Button
            android:layout_width="wrap_content"
            android:layout_height="wrap_content"
            android:id="@+id/option_3_button"
            android:layout_gravity="center_horizontal" />

        <Button
            android:layout_width="wrap_content"
            android:layout_height="wrap_content"
            android:id="@+id/option_4_button"
            android:layout_gravity="center_horizontal" />

        <Button
            android:layout_width="wrap_content"
            android:layout_height="wrap_content"
            android:text="@string/next_button"
            android:id="@+id/next_button"
            android:layout_gravity="center_horizontal"
            android:layout_columnSpan="2"
            />
    </GridLayout>

</LinearLayout>
We'll have to update the string resource file to include the text for the next button. We can also additional questions. We'll store our questions and their associated options as string array resources. Like a string resource, a string array must have a name. To add elements to the string array, we can use the item tag where the content of the tag is an element in the array. A string array for our the options of our existing question looks like this:
<string-array name="question_1">
    <item>What is the capital of Washington?</item>
    <item>Seattle</item>
    <item>Tacoma</item>
    <item>Olympia</item>
    <item>Spokane</item>
</string-array>
To access a string array using it's name, we'll use R.array instead of
R.string in our code. Feel free to add as few or as many questions as you'd
like. The strings.xml resource file should looks like this:
<resources>
    <string name="app_name">TriviaQuiz</string>
    <string name="toast_correct">Correct!</string>
    <string name="toast_incorrect">Incorrect</string>
    <string name="next_button">Next</string>
    <string-array name="question_1">
        <item>What is the capital of Washington?</item>
        <item>Seattle</item>
        <item>Tacoma</item>
        <item>Olympia</item>
        <item>Spokane</item>
    </string-array>
    <string-array name="question_2">
        <item>What is the largest planet in the solar system?</item>
        <item>The Sun</item>
        <item>Earth</item>
        <item>Jupiter</item>
        <item>The Moon</item>
    </string-array>
    <string-array name="options_3">
        <item>What is 2+2?</item>
        <item>4</item>
        <item>22</item>
        <item>0</item>
        <item>1</item>
    </string-array>
</resources>
At this point, the design view of the interface will look similar to the following.

Next, we can update the controller layer, QuizActivity, to display questions and handle user interaction.
Let's add a Question array to store our questions and initialize it with
three instances, once for each question. We can store this as a field named
mQuestions. Addtionally, we can rename our existing fields from
option1Button to mOption1Button and so on, add a field for our
next button, add a field to keep track of our question TextView, and add a
field to keep track of the index of the current question. At this point,
QuizActivity.java should look like this:
public class QuizActivity extends AppCompatActivity {
    private Button mOption1Button;
    private Button mOption2Button;
    private Button mOption3Button;
    private Button mOption4Button;
    private Button mNextButton;

    private TextView mQuestionTextView;

    int mCurrentIndex = 0;

    private Question[] mQuestions = new Question[] {
            new Question(R.array.question_1, 3),
            new Question(R.array.question_2, 3),
            new Question(R.array.question_3, 1)
    };

    @Override
    protected void onCreate(Bundle savedInstanceState) {
        super.onCreate(savedInstanceState);
        setContentView(R.layout.activity_quiz);

        mOption1Button = (Button) findViewById(R.id.option_1_button);
        mOption2Button = (Button) findViewById(R.id.option_2_button);
        mOption3Button = (Button) findViewById(R.id.option_3_button);
        mOption4Button = (Button) findViewById(R.id.option_4_button);

        mOption1Button.setOnClickListener(new View.OnClickListener() {
            @Override
            public void onClick(View v) {
                Toast.makeText(QuizActivity.this, R.string.toast_incorrect,
                        Toast.LENGTH_SHORT).show();
            }
        });

        mOption2Button.setOnClickListener(new View.OnClickListener() {
            @Override
            public void onClick(View v) {
                Toast.makeText(QuizActivity.this, R.string.toast_incorrect,
                        Toast.LENGTH_SHORT).show();
            }
        });

        mOption3Button.setOnClickListener(new View.OnClickListener() {
            @Override
            public void onClick(View v) {
                Toast.makeText(QuizActivity.this, R.string.toast_correct,
                        Toast.LENGTH_SHORT).show();
            }
        });

        mOption4Button.setOnClickListener(new View.OnClickListener() {
            @Override
            public void onClick(View v) {
                Toast.makeText(QuizActivity.this, R.string.toast_incorrect,
                        Toast.LENGTH_SHORT).show();
            }
        });

    }
}
Now that we've added new fields and updated the names of existing ones, let's start adding code. We'll need to assign values to mNextButton and mQuestionTextView; we can do this using findViewById() like we did for mOption1Button.
We can use the setText() method available on Button and TextView objects to display the first question's text and options. Because we'll update the TextView and each Button every time the user advances to the next question, let's create a method to update the text:
private void displayQuestion() {
    Question currentQuestion = mQuestions[mCurrentIndex];
    String[] questionText = getResources()
            .getStringArray(currentQuestion.getQuestionResId());
    mQuestionTextView.setText(questionText[0]);
    mOption1Button.setText(questionText[1]);
    mOption2Button.setText(questionText[2]);
    mOption3Button.setText(questionText[3]);
    mOption4Button.setText(questionText[4]);
}
Here, we retrieve the string array using the Activity.getResources() method to first get a Resources object and then use its getStringArray() method to get a specific string array using its ID.
We can now call displayQuestion() from the onCreate() method to update the view layer with text for the current question. Next, we need to update the listeners for each of the option buttons and add a listener for the next button.
For each option button, we'll want the listener to check if the the clicked button corresponds to the correct answer and make the appropriate toast. Let's add a function that takes an integer parameter representing the clicked button and checks the current question for the correct answer, and makes a toast.
private void checkAnswer(int buttonClicked) {
    Question currentQuestion = mQuestions[mCurrentIndex];
    if (currentQuestion.getCorrectAnswer() == buttonClicked) {
        Toast.makeText(QuizActivity.this, R.string.toast_correct,
                Toast.LENGTH_SHORT).show();
    }
    else {
        Toast.makeText(QuizActivity.this, R.string.toast_incorrect,
                Toast.LENGTH_SHORT).show();
    }
}
We can now call checkAnswer() from each of the option buttons' listeners.
With updated listeners and a listener for the next button, our code should look like this:
public class QuizActivity extends AppCompatActivity {
    private Button mOption1Button;
    private Button mOption2Button;
    private Button mOption3Button;
    private Button mOption4Button;
    private Button mNextButton;

    private TextView mQuestionTextView;

    int mCurrentIndex = 0;

    private Question[] mQuestions = new Question[] {
            new Question(R.array.question_1, 3),
            new Question(R.array.question_2, 3),
            new Question(R.array.question_3, 1)
    };

    private void displayQuestion() {
        Question currentQuestion = mQuestions[mCurrentIndex];
        String[] questionText = getResources()
                .getStringArray(currentQuestion.getQuestionResId());
        mQuestionTextView.setText(questionText[0]);
        mOption1Button.setText(questionText[1]);
        mOption2Button.setText(questionText[2]);
        mOption3Button.setText(questionText[3]);
        mOption4Button.setText(questionText[4]);
    }

    private void checkAnswer(int buttonClicked) {
        Question currentQuestion = mQuestions[mCurrentIndex];
        if (currentQuestion.getCorrectAnswer() == buttonClicked) {
            Toast.makeText(QuizActivity.this, R.string.toast_correct,
                    Toast.LENGTH_SHORT).show();
        }
        else {
            Toast.makeText(QuizActivity.this, R.string.toast_incorrect,
                    Toast.LENGTH_SHORT).show();
        }
    }

    @Override
    protected void onCreate(Bundle savedInstanceState) {
        super.onCreate(savedInstanceState);
        setContentView(R.layout.activity_quiz);

        mOption1Button = (Button) findViewById(R.id.option_1_button);
        mOption2Button = (Button) findViewById(R.id.option_2_button);
        mOption3Button = (Button) findViewById(R.id.option_3_button);
        mOption4Button = (Button) findViewById(R.id.option_4_button);
        mNextButton = (Button) findViewById(R.id.next_button);
        mQuestionTextView = (TextView) findViewById(R.id.question_text_view);

        displayQuestion();

        mOption1Button.setOnClickListener(new View.OnClickListener() {
            @Override
            public void onClick(View v) {
                checkAnswer(1);
            }
        });

        mOption2Button.setOnClickListener(new View.OnClickListener() {
            @Override
            public void onClick(View v) {
                checkAnswer(2);
            }
        });

        mOption3Button.setOnClickListener(new View.OnClickListener() {
            @Override
            public void onClick(View v) {
                checkAnswer(3);
            }
        });

        mOption4Button.setOnClickListener(new View.OnClickListener() {
            @Override
            public void onClick(View v) {
                checkAnswer(4);
            }
        });

        mNextButton.setOnClickListener(new View.OnClickListener() {
            @Override
            public void onClick(View v) {
                mCurrentIndex = (mCurrentIndex + 1) % mQuestions.length;
                displayQuestion();
            }
        });

    }
}
We can see how changes to the view layer (button clicks) require interaction with the model layer and how the model layer is used to populate text in the view layer. Communication between these two layers is handled by the controller layer, QuizActivity.
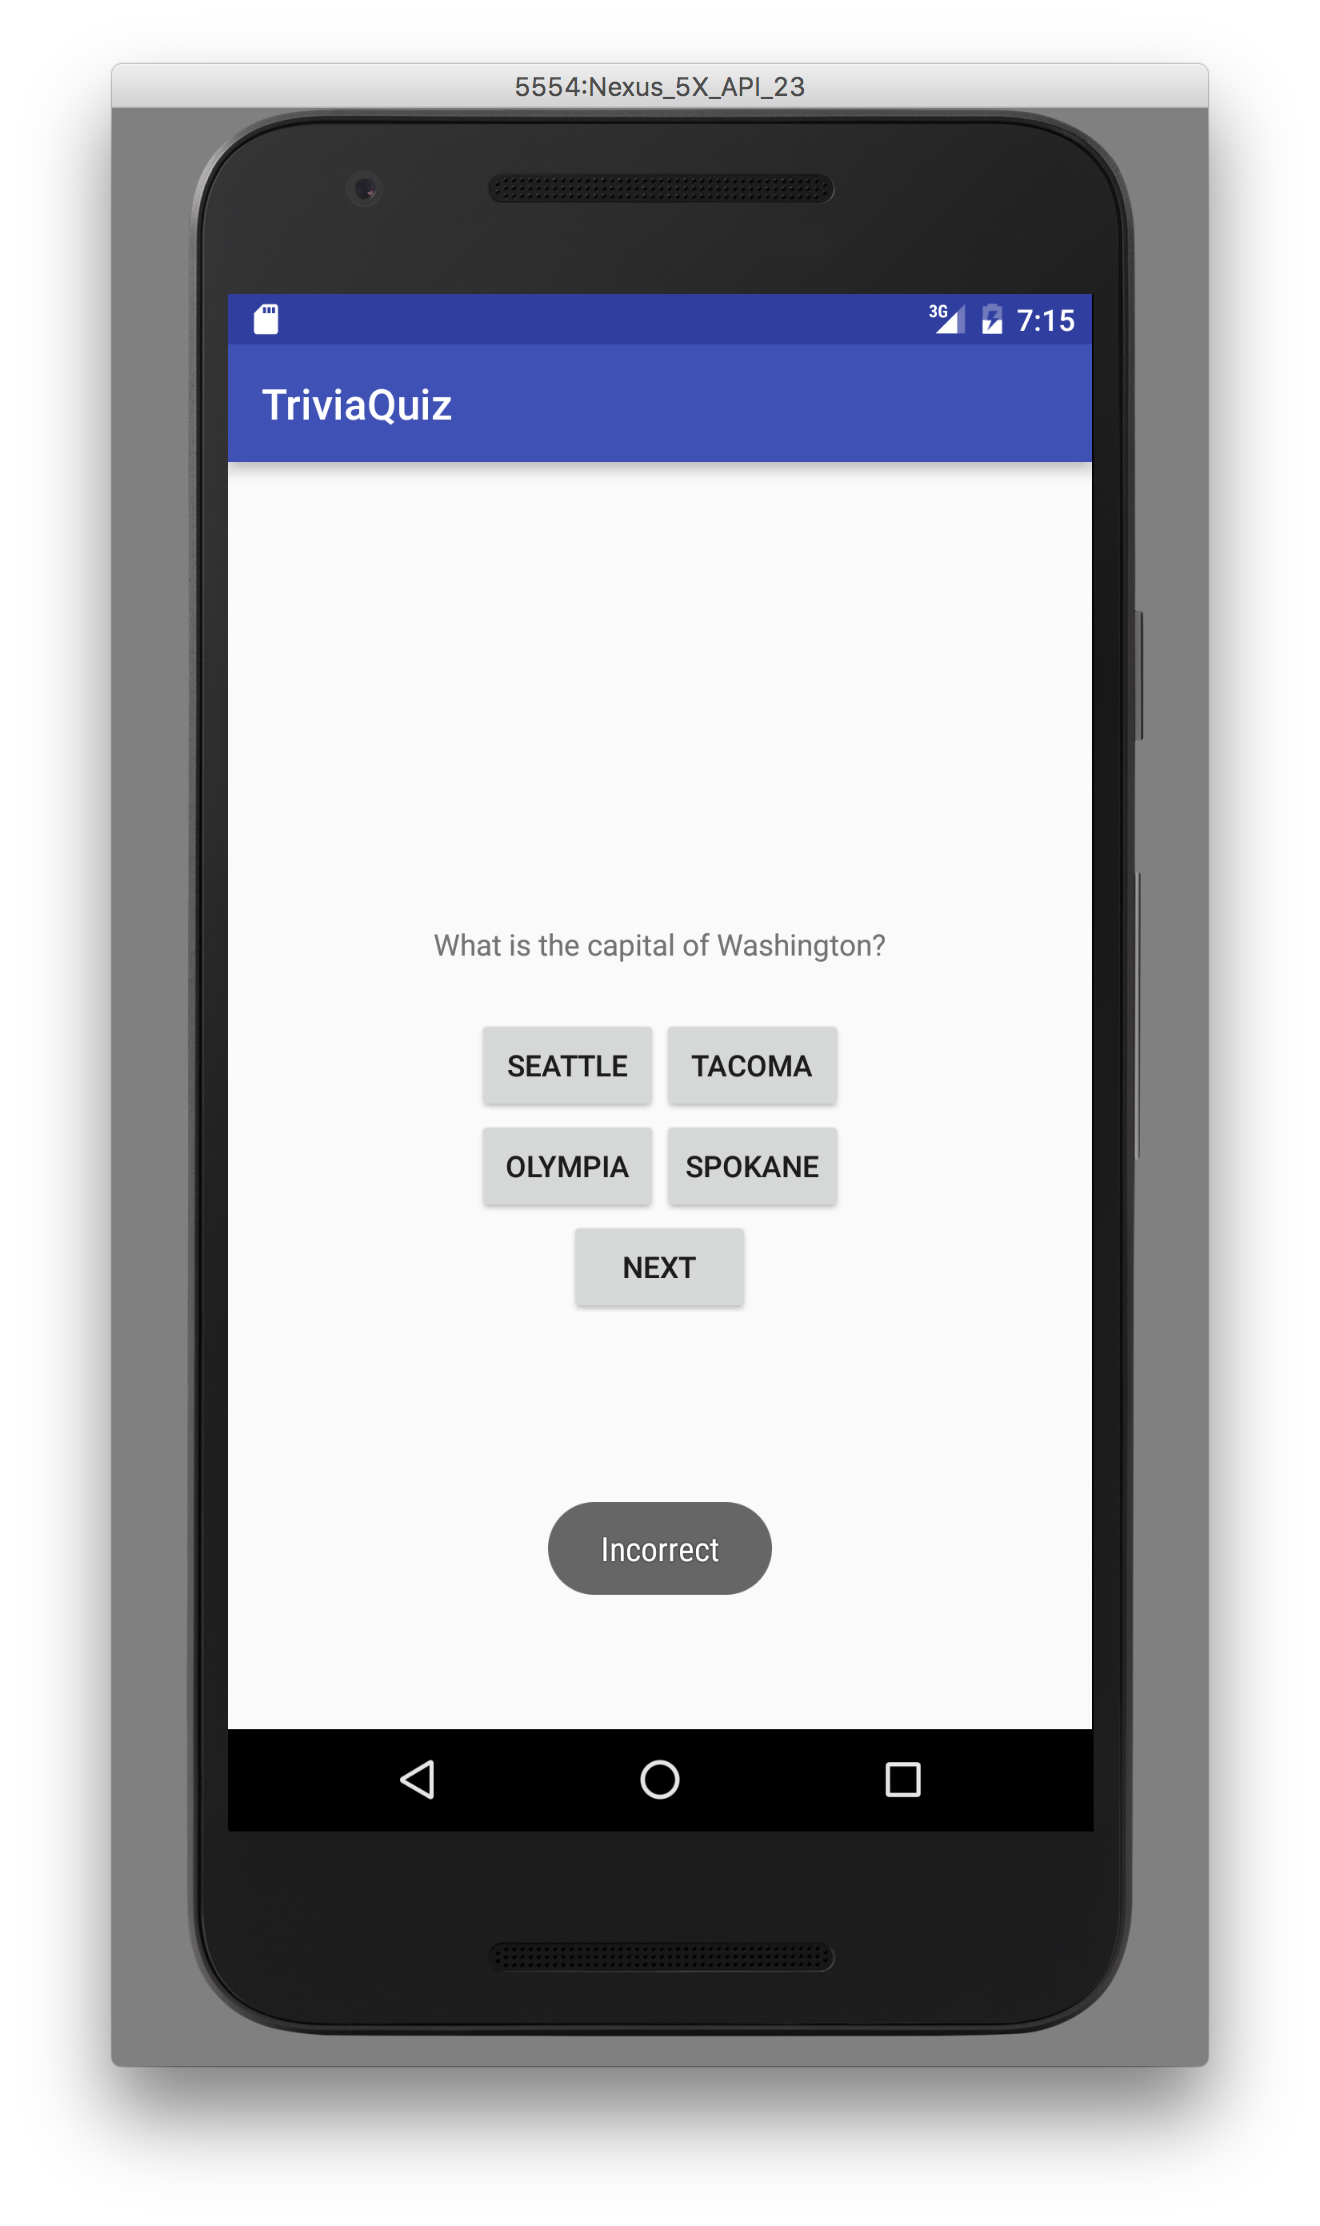
When we start the app and answer the first question incorrectly, we should see something similar to the following:
The Activity Lifecycle
Previously, we said an activity represents something a user can do. Each Activity object has a lifecycle and can transition between three states: running, paused, and stopped. When an app is running, it is visible and in the foreground; when an app is paused, it is visible; when an app is stopped, it is not visible. An activity can also stop existing but once it enters this state, it cannot return to the other three without creating a new Activity instance. For each transition, there is a method that notifies the Activity instance of the state change.
| Original State | New State | Activity Method |
|---|---|---|
| Running | Paused | onPause() |
| Paused | Running | OnResume() |
| Paused | Stopped | onStop() |
| Stopped | Paused | onStart() |
| Stopped | Non-existent | onDestroy() |
| Non-existent | Stopped | onCreate() |
We've already worked with one of these methods, onCreate() to inflate our layout and set listeners on our widgets.
Activity state should not be confused with process state which accounts for apps running in the background.
Demonstration of the Activity Lifecycle
We can see how our app transitions through its various states while we interact with it. To do this, we will make use of the android.util.Log class to create log messages.
The Log class has several methods for logging. For now, we'll use the Log.d() method which has the following method header:
public static int d(String tag, String msg)
Here, d stands for debug which is log message level. Other levels include info, warn, and error and can be used to log messages of different severity/ purpose. The method takes two parameters: tag which represents the source of the message and msg which is the log message itself.
For the tag, we can use the name of the class from which the message is being generate. We can add the following to the QuizActivity class declaration and use TAG whenever we need to log a message:
private static final String TAG = QuizActivity.class.getSimpleName();
This sets the value of TAG to the the name of the QuizActivity class. One
advantage to using this method over using a string literal is that if we rename
the class with Android Studio, TAG will update automatically.
getSimpleName() returns only the class name and not any package information;
this is useful as there is a limit to the tag length.
To log a message and see when QuizActivity.onCreate() is called, we can add the following to the overridden onCreate() method:
Log.d(TAG, "onCreate(Bundle) called");
after the call to super().
public class QuizActivity extends AppCompatActivity {
    private static final String TAG = QuizActivity.class.getSimpleName();

    ...


    @Override
    protected void onCreate(Bundle savedInstanceState) {
        super.onCreate(savedInstanceState);
        Log.d(TAG, "onCreate(Bundle) called");

        ...

    }
}
When we run the app, we should see a line similar to the following in the Android Monitor/logcat window:
06-28 18:01:46.288 2580-2580/com.arthurneuman.triviaquiz D/QuizActivity: onCreate(Bundle) called
We can add logging statements to the other methods associated with the activity lifecycle.
@Override
public void onStart() {
    super.onStart();
    Log.d(TAG, "onStart() called");
}

@Override
public void onPause() {
    super.onPause();
    Log.d(TAG, "onPause() called");
}

@Override
public void onResume() {
    super.onResume();
    Log.d(TAG, "onResume() called");
}

@Override
public void onStop() {
    super.onStop();
    Log.d(TAG, "onStop() called");
}

@Override
public void onDestroy() {
    super.onDestroy();
    Log.d(TAG, "onDestroy() called");
}
It's important to call the overridden method using super to ensure the Activity behaves properly.
If we restart the app, leave the app, and return to it, we can see QuizActivity transition through the various states of the activity lifecycle by following the log messages.
What happens when we rotate the Android device while our app is running?
If you are using the emulator, you can simulate a rotation using the rotate
buttons, which appear inside the red circle in the image below.

Examining the log messages, we can see that QuizActivity is paused, stopped, and destroyed then created, started, and resumed. Further evidence of this can be seen if we advance to the second question and then rotate the device. After rotation, the app presents the first question.
Rotation the device changes the device configuration. The device configuration is a set of properties including screen orientation, screen size, screen density, and language that describe the current state of the device. Often, we'll have different resources (such as layouts for widgets) for different device configurations. When the device configuration changes, Android recreates the activity so that a different resource can be loaded.
In QuizActivity, the mCurrentIndex instance variable stores the index of the current question. We'd like to be able to maintain the value of mCurrentIndex through device rotations.
Saving Data
If we look at the overridden onCreate() method in QuizActivity, we can
see that it takes a single parameter: a Bundle. A bundle is a data
structure that maps string keys to values of certain types. We can add data to
a bundle to store our activities state when it's stopped or paused and use
that data to restore our activity if it has to be recreated. Android
handles creating the bundle and keeping track of the appropriate activity as
long as the application's process is running.
To use a bundle to store the value of mCurrentIndex, let's first define a static field that specifies the key name in the bundle. We can add the following to our QuizActivity class declaration:
private static final String KEY_INDEX = "index";
In addition to the methods we listed above, there is another method that is called during activity state changes:
public void onSaveInstanceState(Bundle savedInstanceState)
We can override this method to add data to the bundle. Add the following to QuizActivity:
@Override
public void onSaveInstanceState(Bundle savedInstanceState) {
    super.onSaveInstanceState(savedInstanceState);
    Log.d(TAG, "onSaveInstanceState() called");
    savedInstanceState.putInt(KEY_INDEX, mCurrentIndex);
}
Now, when the activity is paused or stopped, the value of mCurrentIndex will be stored in the bundle associated with the activity.
To restore the value of mCurrentIndex, we can modify onCreate() to include the following after the call to Log.d():
if (savedInstanceState != null) {
    mCurrentIndex = savedInstanceState.getInt(KEY_INDEX, 0);
}
It's important to check that savedInstanceState is not null; if the
activity is being created for the first time after the application's process
was stopped, savedInstanceState will be null and calling getInt() will
throw a NullPointerException. The second argument to getInt() is the
default value to use if the key is not found in the bundle.
If we restart the application, advance to the second question, and rotate the device, we should now still see the second question.
The complete code for QuizActivity.java appears below.
public class QuizActivity extends AppCompatActivity {
    private static final String TAG = QuizActivity.class.getSimpleName();
    private static final String KEY_INDEX = "index";

    private Button mOption1Button;
    private Button mOption2Button;
    private Button mOption3Button;
    private Button mOption4Button;
    private Button mNextButton;

    private TextView mQuestionTextView;

    int mCurrentIndex = 0;

    private Question[] mQuestions = new Question[] {
            new Question(R.array.question_1, 3),
            new Question(R.array.question_2, 3),
            new Question(R.array.question_3, 1)
    };

    private void displayQuestion() {
        Question currentQuestion = mQuestions[mCurrentIndex];
        String[] questionText = getResources()
                .getStringArray(currentQuestion.getQuestionResId());
        mQuestionTextView.setText(questionText[0]);
        mOption1Button.setText(questionText[1]);
        mOption2Button.setText(questionText[2]);
        mOption3Button.setText(questionText[3]);
        mOption4Button.setText(questionText[4]);
    }

    private void checkAnswer(int buttonClicked) {
        Question currentQuestion = mQuestions[mCurrentIndex];
        if (currentQuestion.getCorrectAnswer() == buttonClicked) {
            Toast.makeText(QuizActivity.this, R.string.toast_correct,
                    Toast.LENGTH_SHORT).show();
        }
        else {
            Toast.makeText(QuizActivity.this, R.string.toast_incorrect,
                    Toast.LENGTH_SHORT).show();
        }
    }

    @Override
    protected void onCreate(Bundle savedInstanceState) {
        super.onCreate(savedInstanceState);
        Log.d(TAG, "onCreate(Bundle) called");

        if (savedInstanceState != null) {
            mCurrentIndex = savedInstanceState.getInt(KEY_INDEX, 0);
        }

        setContentView(R.layout.activity_quiz);

        mOption1Button = (Button) findViewById(R.id.option_1_button);
        mOption2Button = (Button) findViewById(R.id.option_2_button);
        mOption3Button = (Button) findViewById(R.id.option_3_button);
        mOption4Button = (Button) findViewById(R.id.option_4_button);
        mNextButton = (Button) findViewById(R.id.next_button);
        mQuestionTextView = (TextView) findViewById(R.id.question_text_view);

        displayQuestion();

        mOption1Button.setOnClickListener(new View.OnClickListener() {
            @Override
            public void onClick(View v) {
                checkAnswer(1);
            }
        });

        mOption2Button.setOnClickListener(new View.OnClickListener() {
            @Override
            public void onClick(View v) {
                checkAnswer(2);
            }
        });

        mOption3Button.setOnClickListener(new View.OnClickListener() {
            @Override
            public void onClick(View v) {
                checkAnswer(3);
            }
        });

        mOption4Button.setOnClickListener(new View.OnClickListener() {
            @Override
            public void onClick(View v) {
                checkAnswer(4);
            }
        });

        mNextButton.setOnClickListener(new View.OnClickListener() {
            @Override
            public void onClick(View v) {
                mCurrentIndex = (mCurrentIndex + 1) % mQuestions.length;
                displayQuestion();
            }
        });

    }

    @Override
    public void onSaveInstanceState(Bundle savedInstanceState) {
        super.onSaveInstanceState(savedInstanceState);
        Log.d(TAG, "onSaveInstanceState() called");
        savedInstanceState.putInt(KEY_INDEX, mCurrentIndex);
    }

    @Override
    public void onStart() {
        super.onStart();
        Log.d(TAG, "onStart() called");
    }

    @Override
    public void onPause() {
        super.onPause();
        Log.d(TAG, "onPause() called");
    }

    @Override
    public void onResume() {
        super.onResume();
        Log.d(TAG, "onResume() called");
    }

    @Override
    public void onStop() {
        super.onStop();
        Log.d(TAG, "onStop() called");
    }

    @Override
    public void onDestroy() {
        super.onDestroy();
        Log.d(TAG, "onDestroy() called");
    }
}