Week 8 - The Toolbar, Menus, and Navigation
Corresponding Text
Android Programming, pp. 235-254
The AppCompat Library
We're going to be working with the toolbar. The toolbar provides a means of providing the user with actions, an additional way of navigating through the app, and a way of consistently branding the app. The toolbar was added to Android in version 5.0; prior to this, app made us of an action bar. The toolbar builds on the action bar but is more flexible. Android version 5.0 corresponds to SDK version 21; since our app support SDK version 19, we won't be able to use the native tool bar from the Android library. Instead, we can use a back-ported version from the AppCompat library. We'll have to make a few changes to our app to make use of the AppCompat library and the toolbar provided by it.
First, let's add the AppCompat library as a dependency of our app. In Android
Studio, select File -> Project Structure... from the menus. With app
selected, click the Dependencies tab. Click the + button and
Add Library dependency. Search for com.android.support:appcompat-v7.
Click OK to close the Project Structure dialog.
Next, we need to make sure the app is using one of the AppCompat theme's. Open
app/manifests/AndroidManifest.xml and note the value of the android:theme
attribute: @style/AppTheme. The theme is defined in res/values/styles.xml.
The file should contain something like this:
<style name="AppTheme" parent="Theme.AppCompat.Light.DarkActionBar">
If it doesn't, change the parent attribute so it matches the value above.
Finally, we have to update all our activities to extend AppCompatActivity. So far, all our activities have extended FragmentActivity or a subclass of FragmentActivity. We won't lose any functionality by extending AppCompatActivity instead of FragmentActivity because AppCompatActivity itself extends FragmentActivity. For our app, we'll need to update ContactPagerActivity and SingleFragmentActivity to extend AppCompatActivity. We don't need to make any changes to ContactActivity or AddressBookActivity since they extend SingleFragmentActivity.
At this point, we can run the app. The only difference is the new toolbar at the top of our app.
Menus
The right area of the toolbar is reserved for the menu. A menu consists of
action items that can perform an action on the current screen or on the
app as a whole. We'll create actions to create a contact and to display
favorites or all contacts. We'll need some string resources for use with the
menu; add these to res/values/strings.xml:
    <string name="new_contact">New Contact</string>
    <string name="show_favorites">Show Favorites</string>
    <string name="show_all">Show All</string>
Menus, like layouts, are a type of resource file. To add a new menu resource
file, right click on the project's res folder and select
New -> Android resource file. Name the file fragment_address_book (since
we'll be using it with the address book fragment) and set Resource type to
Menu
Using the Design view, drag a Menu Item and drop it on the toolbar; set
its id to menu_item_create_contact and its title to
@string/new_contact. Drag another Menu Item below the previous one and set
its id to menu_item_toggle_favorites and its title to
@string/show_favorites. The XML for the menu resource file should look
like this:
<?xml version="1.0" encoding="utf-8"?>
<menu xmlns:app="http://schemas.android.com/apk/res-auto"
      xmlns:android="http://schemas.android.com/apk/res/android">

    <item android:title="@string/new_contact"
          android:id="@+id/menu_item_create_contact"
        />
    <item android:title="@string/show_favorites"
          android:id="@+id/menu_item_toggle_favorites"
        />
</menu>
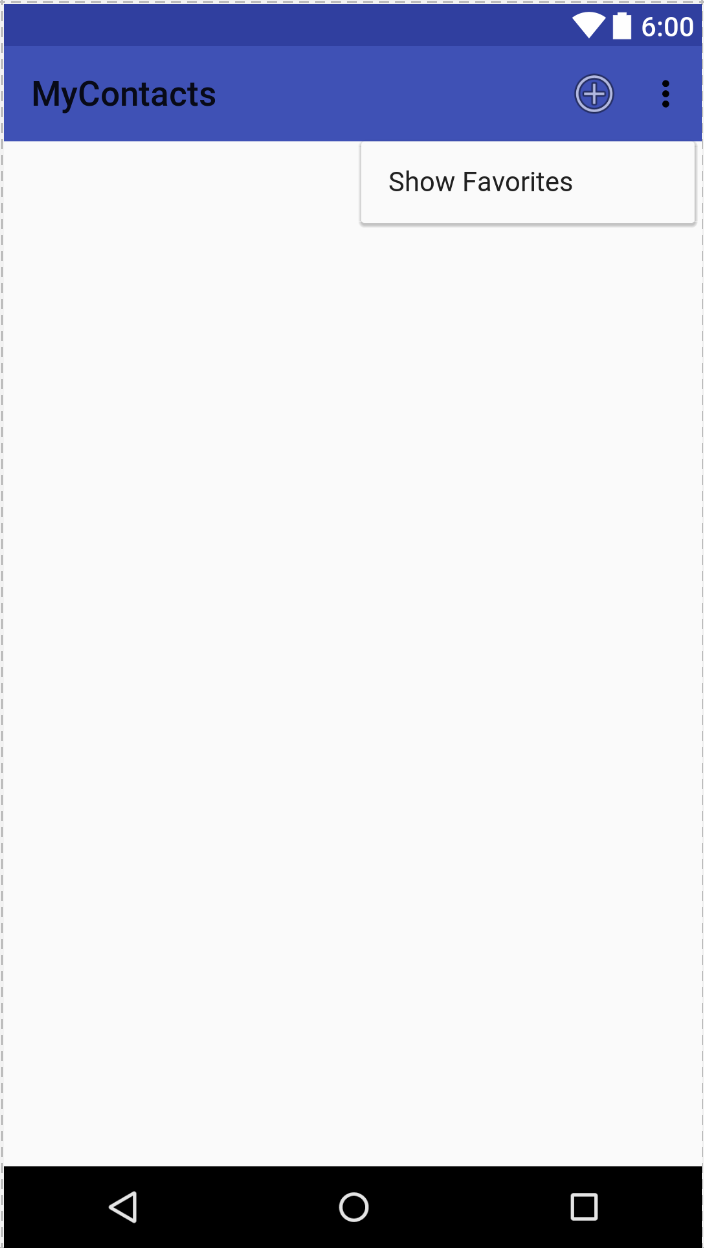
The menu is currently configured such that its menu items appear in the overflow menu, accessed by pressing the three dots on the right side of the toolbar. Let's keep the toggle item in the overflow menu but move the new contact item out of the overflow menu and use an icon as well as text, provided there's enough room on the screen.
With the new contact menu item selected, click the button next to the icon
field. Search for and select ic_menu_add. Change the value of
showAsAction to include ifRoom and `withText``.
The XML for the menu resource file should now look like this:
<?xml version="1.0" encoding="utf-8"?>
<menu xmlns:app="http://schemas.android.com/apk/res-auto"
      xmlns:android="http://schemas.android.com/apk/res/android">

    <item android:title="@string/new_contact"
          android:id="@+id/menu_item_create_contact"
          android:icon="@android:drawable/ic_menu_add"
          app:showAsAction="ifRoom|withText"/>
    <item android:title="@string/show_favorites"
          android:id="@+id/menu_item_toggle_favorites"
        />
</menu>
Note that we have to use the app:showAsAction attribute rather than the default android:showAsAction attribute due to legacy support issues with the AppCompat library.
The design view should look like this:
Now that we've designed the menu, let's add it to our app. In Android, menus
are managed by callbacks from the Activity class. When a menu is needed,
Activity.onCreateOptionsMenu() is called. Our app, however, relies on
code to be implemented in fragments. Fortunately, framgments also have
a onCreateOptionsMenu() that we can override. The FragmentManager is
responsible for call the appropriate fragment's method when the hosting
activity's onCreateOptionsMenu() method is called. To notify the
FragmentManager that this fragment can receive callbacks, we have to add
a call to setHasOptionsMenu(true) in the AddressBookFragment.onCreate()
method.
To add the menu to the address book, add the following code to the AddressBookFragment class:
public class AddressBookFragment extends Fragment {
    ...
    @Override
    public void onCreate(Bundle savedInstanceState) {
        super.onCreate(savedInstanceState);
        setHasOptionsMenu(true);
    }

    @Override
    public void onCreateOptionsMenu(Menu menu, MenuInflater inflater) {
        super.onCreateOptionsMenu(menu, inflater);
        inflater.inflate(R.menu.fragment_address_book, menu);
    }
    ...
}
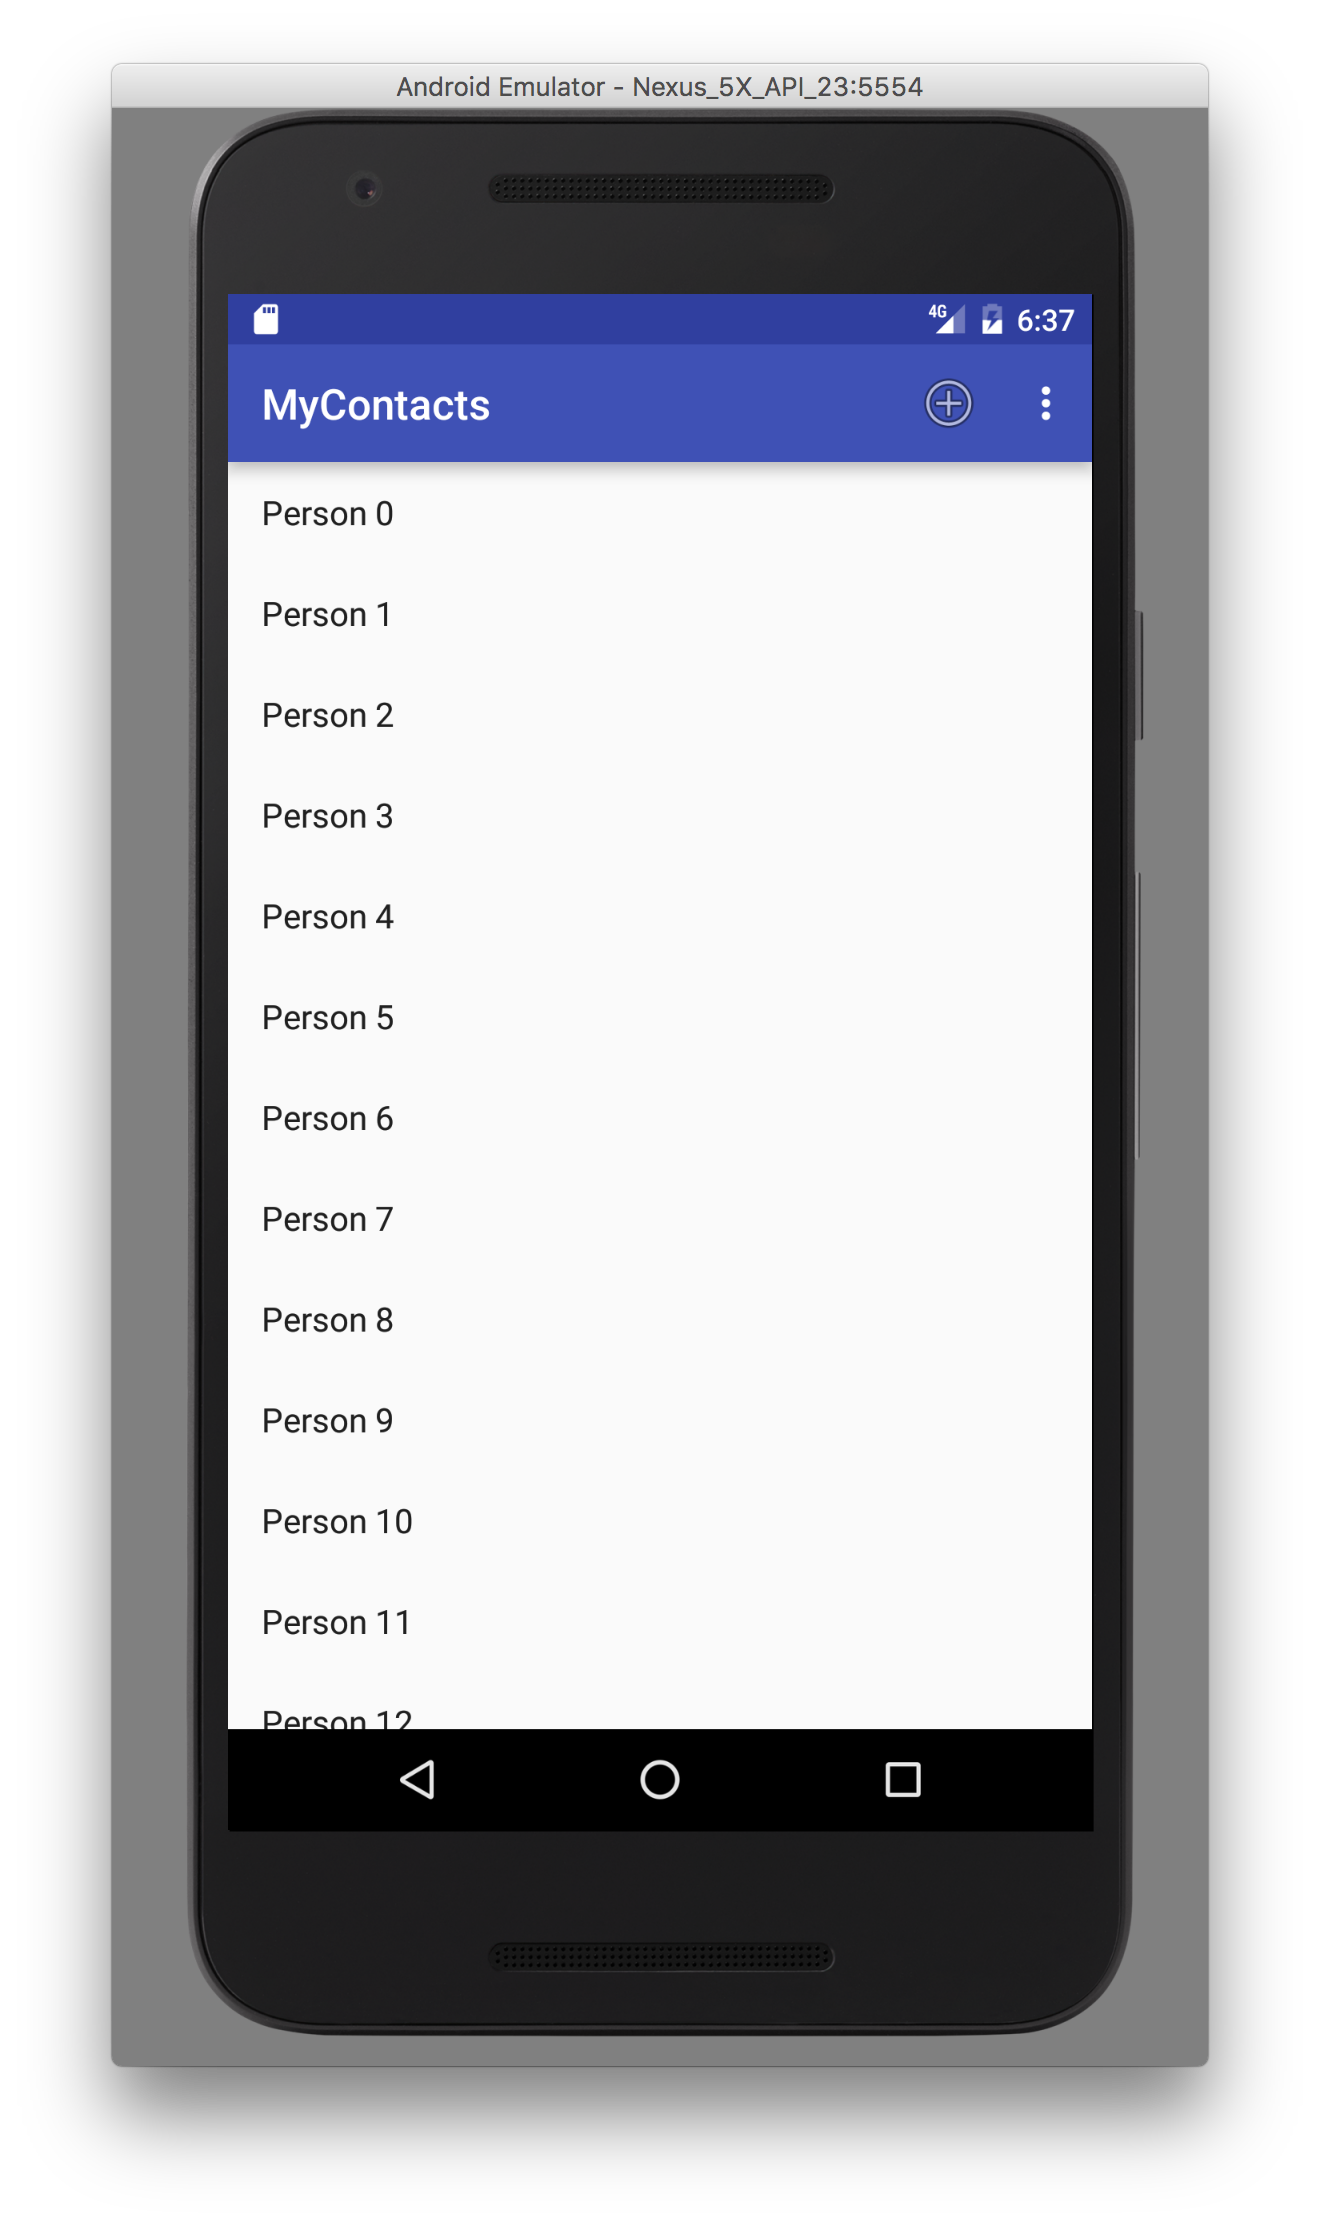
Here, we call MenuInflater.inflate() specifying the id of our menu resource and the Menu instance that will be populated with our menu items. We can now run the app and we should be able to see the menu items.
Now that we have the menu appearing in the app, we need to add code that will perform some action when a user selects one of the menu items. To do this, we have to override the onOptionsItemSelected() method in AddressBookFragment. When the method is called, a MenuItem is passed as a parameter. We can use MenuItem.getItemId() to get the ID of the item and determine the appropriate action.
Before we handle the menu items, let's add a method to AddressBook:
public class AddressBook {
    ...
    public List<Contact> getFavoriteContacts() {
        List<Contact> favorites = new ArrayList<>();
        for (Contact c: mContacts) {
            if (c.isFavorite()) {
                favorites.add(c);
            }
        }
        return favorites;
    }
    ...
}
This method will return a list of contacts marked as favorites. Next, we can add the code necessary to toggle between showing all contacts and those that are favorites:
public class AddressBookFragment extends Fragment {
    ...
    private boolean mShowFavoritesOnly = false;
    ...
    @Override
    public boolean onOptionsItemSelected(MenuItem item) {
        switch (item.getItemId()) {
            case R.id.menu_item_create_contact:
                // we'll add this later
                return true;
            case R.id.menu_item_toggle_favorites:
                mShowFavoritesOnly = !mShowFavoritesOnly;
                if (mShowFavoritesOnly) {
                    item.setTitle(R.string.show_all);
                    mContactAdapter.mContacts =
                            AddressBook.get().getFavoriteContacts();
                }
                else {
                    item.setTitle(R.string.show_favorites);
                    mContactAdapter.mContacts =
                            AddressBook.get().getContacts();
                }
                mContactAdapter.notifyDataSetChanged();
                return true;
            default:
                return super.onOptionsItemSelected(item);
        }
    }
    ...
}
First, we'll keep track of whether or not we're displaying only favorite contacts or all contacts using a private field, mShowFavoritesOnly. In the onOptionsItemSelected() method, we'll determine what to do based on the menu item's ID. We'll add code to add a new contact shortly. For now, we can toggle between favorites and all contacts by first changing the value of mShowFavoritesOnly then setting the menu item's title and the adapter's list of contacts based on the value of mShowFavoritesOnly. After we change the adapter's list of contacts, we have to call Adapter.notifyDataSetChanged(). Finally, we return true to indicate no further processing of the item is necessary.
To support adding new contacts, let's first reduce the number of contacts that are automatically generated - we'll keep some so they exist when we start the app. Recall that we create these initial contacts in the AddressBook constructor. While we're modifying AddressBook, let's also add a method to add a contact to the list of contacts. Here's what AddressBook should look like:
public class AddressBook {
    ...
    private AddressBook() {
        mContacts = new ArrayList<>();
        for (int i=0; i<5; i++) {
            Contact contact = new Contact();
            contact.setName("Person " + i);
            contact.setEmail("Person" + i + "@email.com");

            // set every 2nd as a favorite
            if (i % 2 == 0) {
                contact.setFavorite(true);
            }

            mContacts.add(contact);
        }
    }
    ...
    public void add(Contact contact) {
        mContacts.add(contact);
    }
    ...
}
Next, we can add code to handle the new contact menu item to AddressBookFragment:
public class AddressBookFragment extends Fragment {
    ...
    @Override
    public boolean onOptionsItemSelected(MenuItem item) {
        switch (item.getItemId()) {
            case R.id.menu_item_create_contact:
                Contact contact = new Contact();
                AddressBook.get().add(contact);
                Intent intent = ContactPagerActivity.newIntent(
                        getActivity(),contact.getID());
                startActivity(intent);
                return true;
            case R.id.menu_item_toggle_favorites:
                mShowFavoritesOnly = !mShowFavoritesOnly;
                if (mShowFavoritesOnly) {
                    item.setTitle(R.string.show_all);
                    mContactAdapter.mContacts =
                            AddressBook.get().getFavoriteContacts();
                }
                else {
                    item.setTitle(R.string.show_favorites);
                    mContactAdapter.mContacts =
                            AddressBook.get().getContacts();
                }
                mContactAdapter.notifyDataSetChanged();
                return true;
            default:
                return super.onOptionsItemSelected(item);
        }
    }
    ...
}
This new code creates a Contact, adds it to the AddressBook, and then uses ContactPagerActivity to create an intent and display the contact's details which we can edit. We can now run the app, add contacts, and filter the list to display only our favorites.
Hierarchical Navigation
So far, we've been able to use the back button to return to a previous screen while using our app. This type of navigation is called temporal navigation - using the back button takes us back to the last place we were. An alternative to temporal navigation is hierarchical navigation. Hierarchical navigation allows users to move up the app hierarchy - returning to the parent activity at any time. Hierarchical navigation is made available to users through an up button that appears as a left-pointing arrow in the toolbar. In order to enable this functionality, we have to specify an activity's parent in the app's manifest. The following will allow users to return to the AddressBookActivity from the ContactPagerActivity:
<?xml version="1.0" encoding="utf-8"?>
<manifest xmlns:android="http://schemas.android.com/apk/res/android"
          package="com.arthurneuman.mycontacts">

    <application
        android:allowBackup="true"
        android:icon="@mipmap/ic_launcher"
        android:label="@string/app_name"
        android:supportsRtl="true"
        android:theme="@style/AppTheme">
        <activity android:name=".ContactPagerActivity"
            android:parentActivityName=".AddressBookActivity">
        </activity>
        <activity android:name=".AddressBookActivity">
            <intent-filter>
                <action android:name="android.intent.action.MAIN"/>
                <category android:name="android.intent.category.LAUNCHER"/>
            </intent-filter>
        </activity>
    </application>

</manifest>
While this performs the same action as pushing the back button in our app, in more complicated apps, this could be more useful. In more complicated apps, hierarchical navigation would allow to return to a screen that would normally require multiple presses of the back button.