Week 14 - Layout Flexibility
Corresponding Text
Android Programming, pp. 307-322
We've done a lot of work so far on our app and it looks pretty good when we use it in the emulator or when using a small device. What happens when we try to use our app on a tablet? Let's find out. If you don't have a tablet with which to test, we can create one in the emulator. Select Tools -> Android -> AVD Manager from the menus. In the Android Virtual Device Manager Window, click the Create Virtual Device button. Select Tablet and choose the Nexus 10. Continue through the creation wizard, make sure to use the same API level we've been working with. Once the new virtual device has been created, start the app.
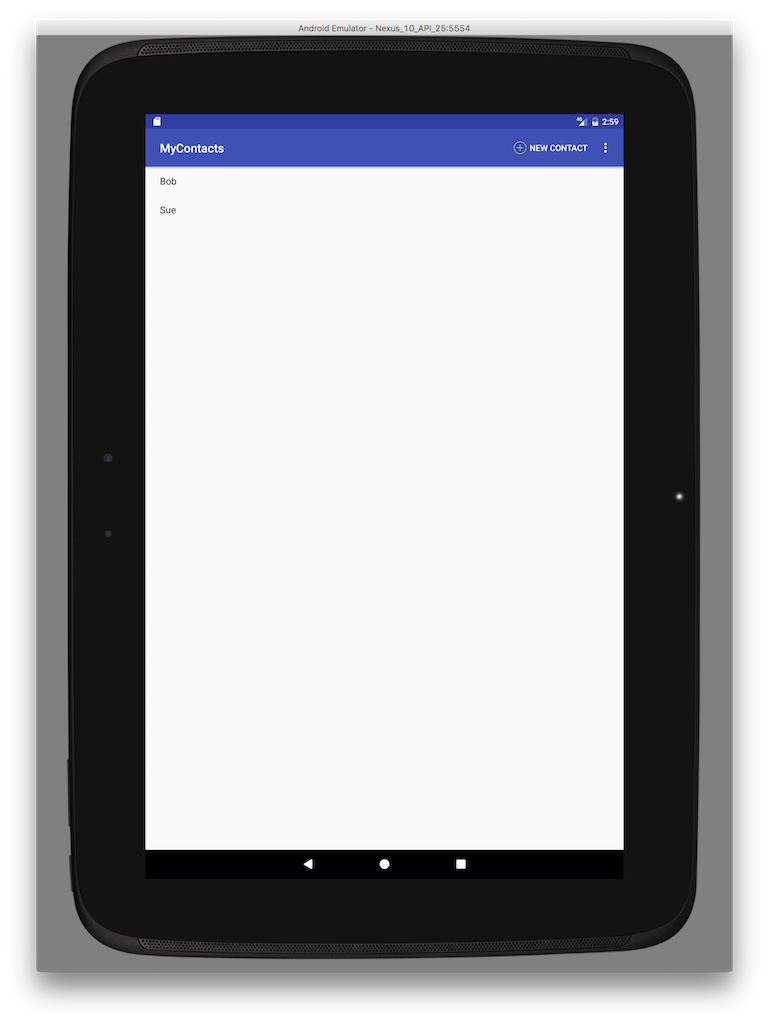
Notice the excessive amount of white space. Even if we add lots of contacts to our app, most of the screen will be empty white space. To take advantage of space provided by a tablet, we'll modify our app to display both the list of contacts as well contact details when the app is run on a tablet.
Creating a new Layout
Currently, AddressBookActivity extends SingleFragmentActivity and SingleFragmentActivity always inflates the activity_fragment layout. To be more flexible, we'll modify SingleFragmentActivity to allow subclasses to specify the appropriate layout.
public abstract class SingleFragmentActivity extends AppCompatActivity {
    ...

    @LayoutRes
    protected int getLayoutResId() {
        return R.layout.activity_fragment;
    }

    @Override
    protected void onCreate(Bundle savedInstanceState) {
        super.onCreate(savedInstanceState);
        setContentView(getLayoutResId());

        FragmentManager fm = getSupportFragmentManager();
        Fragment fragment = fm.findFragmentById(R.id.fragment_container);

        if (fragment==null) {
            fragment = createFragment();
            fm.beginTransaction()
                    .add(R.id.fragment_container, fragment)
                    .commit();
        }

    }
}
We've added a getLayoutResId() method that returns the ID of a layout; a
subclass can override this method to indicate a different layout. The
@LayoutRes annotation indicates that the integer returned by this method
corresponds to the ID of a layout. In the onCreate() method, we've replaced
the explicit value of R.layout.activity_fragment with a call to
getLayoutResId().
As a next step, we'll create a new layout file to host two fragments. Create
a new layout file named activity_twopane.xml. Change the default
LinearLayout properties so that the orientation is set to horizontal,
showDividers includes middle, and divider is set to
?attr/dividerHorizontal. Add two FrameLayout widgets to the
LinearLayout. Set the ID of the first to fragment_container and the ID of
the second to detail_fragment_container. Change the width of both fragment
containers to 0dp and set the layout_weight of the first to 1 and the
second to 3 - this will provide 25% of the width to the first container and
75% to the second.
The XML for the new layout should look like the following:
<?xml version="1.0" encoding="utf-8"?>
<LinearLayout xmlns:android="http://schemas.android.com/apk/res/android"
              xmlns:tools="http://schemas.android.com/tools"
              android:orientation="horizontal"
              android:layout_width="match_parent"
              android:layout_height="match_parent"
              android:showDividers="middle"
              android:divider="?attr/dividerHorizontal">

    <FrameLayout
        android:layout_width="0dp"
        android:layout_height="match_parent"
        android:id="@+id/fragment_container"
        android:layout_weight="1">

    </FrameLayout>

    <FrameLayout
        android:layout_width="0dp"
        android:layout_height="match_parent"
        android:id="@+id/detail_fragment_container"
        android:layout_weight="3">

    </FrameLayout>
</LinearLayout>
Alias Resources
An alias resource is simply a resource that points to another resource.
We'll use an alias resource to that points to activity_fragment.xml on phones
and activity_twopane.xml on tablets. Alias resources are stored in the
res/values directory and usually in a file named refs.xml. Create a new
values resource file named refs.xml and add the following:
<?xml version="1.0" encoding="utf-8"?>
<resources>
    <item name="activity_listdetail" type="layout">@layout/activity_fragment</item>
</resources>
This defines a new resource named activity_listdetail and points to the
existing activity_fragment layout. Let's update AddressBookActivity to use
the new activity_listdetail resource as its layout.
public class AddressBookActivity extends SingleFragmentActivity {
    @Override
    protected int getLayoutResId() {
        return R.layout.activity_listdetail;
    }

    ...
}
If we were to run the app now, it wouldnt't look any different. Because the
alias is specificed in res/values/, it is the default alias;
AddressBookActivity inflates the single-pane layout by default. To create
an alternate for tablets, go through the process of creating another values
resource file named refs.xml but don't click OK in the
New Resource File window. In the Available quantifiers section, select
Smallest Screen Width and press the >> button. Enter a value of 600
and click OK. A new file has been created in the res/values-sw600dp
directory; modify the new file so it looks like this:
<?xml version="1.0" encoding="utf-8"?>
<resources>
    <item name="activity_listdetail" type="layout">@layout/activity_twopane</item>
</resources>
With this new file, Android has two options when evaluating the activity_listdetail alias. When the screen's smallest dimension is 600dp or greater, use activity_twopane; otherwise, use the default value of activity_fragment. Note that even though the quantifier is named "smallest screen width", it actually refers to the smallest dimension (width or height).
Running that app on a phone should now look like is has looked previously. Running it on tablet should show the list of the contacts on the left, an empty space on the right, and a divider between them. Note that the interface will likely look better in landscape orientation on a tablet.
While we could have created activity_twopane in a res/layout-sw600dp
directory and avoided the use of alias resources, as our apps become more
complex, we would find that we would have to copy lots of data between various
resource files.
Showing Contact details
Now that we have a layout for use when using a phone and another for use with tablets, we need to make use of the right part of the two-pane layout for tablets. While we could modify ContactHolders's onClick() method to add a ContactFragment to the detail_fragment_container, this forces AddressBookFragment (which contains ContactHolder) to make assumptions about its hosting Activity. Instead, we'll rely on the hosting Activity to populate detail_fragment_container if necessary.
In order for the hosting activity to handle these tasks, we need to delegate some of the fragment's functionality back to the activity. To do this, we'll make use of a callback interface - an interface the hosting activity must implement. This will ensure that activity is able to provide required functionality while not requiring that the fragment know anything else about the activity. To begin, modify AddressBookFragment to include the following.
public class AddressBookFragment extends Fragment {
    ...
    private Callbacks mCallbacks;

    public interface Callbacks {
        void onContactSelected(Contact contact);
    }

    @Override
    public void onAttach(Context context) {
        super.onAttach(context);
        mCallbacks = (Callbacks) context;
    }

    @Override
    public void onDetach() {
        super.onDetach();
        mCallbacks = null;
    }
    ...
}
Here we create a private field, mCallbacks, define the Callbacks interface, and set a value for mCallbacks in the onAttach() method, a lifecycle method. In the onDetach() method, another lifecycle method, we set mCallbacks to null. The onAttach() and onDetach() methods are called when a fragment is added or removed from an activity.
Next, we can implement AddressBookFragment.Callbacks in AddressBookActivity:
public class AddressBookActivity extends SingleFragmentActivity
        implements AddressBookFragment.Callbacks{

    ...

    @Override
    public void onContactSelected(Contact contact) {
        // when viewed on a phone
        if (findViewById(R.id.detail_fragment_container) == null) {
            Intent intent = ContactPagerActivity.newIntent(this, contact.getID());
            startActivity(intent);
        }
        // when viewed on a tablet
        else {
            Fragment newDetail = ContactFragment.newInstance(contact.getID());
            getSupportFragmentManager().beginTransaction()
                    .replace(R.id.detail_fragment_container, newDetail)
                    .commit();
        }
    }
}
In the onContactSelected() method, we've included code to show the contact details depending on whether R.id.detail_fragment_container is defined or not; this determines whether we're viewing the app on a phone or on a tablet. On a phone, we start the ContactPagerActivity; on a tablet, we replace the contents of R.id.detail_fragment_container with the content of a new ContactFragment.
Now we need to update AddressBookFragment to call onContactSelected() where we previously started a new ContactPagerActivity:
public class AddressBookFragment extends Fragment {
    ...

    @Override
    public boolean onOptionsItemSelected(MenuItem item) {
        switch (item.getItemId()) {
            case R.id.menu_item_create_contact:
                Contact contact = new Contact();
                AddressBook.get(getContext()).add(contact);
                mCallbacks.onContactSelected(contact);
                return true;
            ...
        }
    }

    private class ContactHolder extends RecyclerView.ViewHolder
            implements View.OnClickListener{
        ...

        @Override
        public void onClick(View v) {
            mCallbacks.onContactSelected(mContact);
        }
    }

    ...
}
If you run the app now, it should behave as expected on a phone and should display contact details next to the list of contacts on a tablet. There is one small problem on a tablet, however: if we modify a contact's name, the change does not appear in the list of contacts. To resolve this, we'll add another callback interface - this time to ContactFragment.
public class ContactFragment extends Fragment {
    ...
    private Callbacks mCallbacks;

    ...

    public interface Callbacks {
        void onContactUpdated(Contact contact);
    }

    ...

    @Override
    public void onAttach(Context context) {
        super.onAttach(context);
        mCallbacks = (Callbacks)context;
    }

    @Override
    public void onDetach() {
        super.onDetach();
        mCallbacks = null;
    }

    ...
}
Now we can update AddressBookActivity to implement the new interface:
public class AddressBookActivity extends SingleFragmentActivity
        implements AddressBookFragment.Callbacks, ContactFragment.Callbacks{

    ...

    @Override
    public void onContactUpdated(Contact contact) {
        AddressBookFragment addressBookFragment = (AddressBookFragment) getSupportFragmentManager()
                .findFragmentById(R.id.fragment_container);
        addressBookFragment.updateUI();
    }
}
Note that AddressBookFragment.updateUI() must have public access.
ContactFragment.Callbacks must be implemented by all activities that host the fragment, so we have to update ContactPagerActivity to implement the method. In this case, the implementation can be empty.
public class ContactPagerActivity extends AppCompatActivity implements ContactFragment.Callbacks {

    ...

    @Override
    public void onContactUpdated(Contact contact) {

    }
}
Finally, we can update ContactFragment to call onContactUpdated() when the name is changed:
public class ContactFragment extends Fragment {
    ...

    @Override
    public View onCreateView(LayoutInflater inflater, ViewGroup container,
                             Bundle savedInstanceState) {
        ...

        mNameField.addTextChangedListener(new TextWatcher() {
            ...

            @Override
            public void onTextChanged(CharSequence s, int start, int before,
                                      int count) {
                mContact.setName(s.toString());
                AddressBook.get(getContext()).updateContact(mContact);
                mCallbacks.onContactUpdated(mContact);
            }

            ...
        });

        ...
    }

    ...
}
If the contacts list included more than just the contact's name, we would need to call mCallbacks.onContactUpdated() whenever a displayed item was updated.
Test the app on both a phone and tablet to ensure it works as expected.