Week 3 - Debugging and Additional Activities
Corresponding Text
Android Programming, pp. 75-109
Debugging
Logging
As we develop applications, we're likely to run into unexpected behavior including thrown exceptions and errors. When this happens, we can debug our application. At the most basic level, we can log messages about our application's state to help determine what the problem is. We can also use more advanced tools to find and address issues.
To begin, let's modify our existing code. If we comment out the following line in QuizActivity, our app will crash.
mQuestionTextView = (TextView) findViewById(R.id.question_text_view);
After commenting out the code, try running the application. The application should crash.

If you look at the log window in Android Studio you should see a stack trace that indicates a RuntimeException was thrown and was caused by a NullPointerException. The details of the NullPointerException indicate that we tried to call setText() on a Null objects. mQuestionTextView is null because we commented out the code that assigned a value to that field. Here, the stack trace is helpful in finding the bug. Let's uncomment the code we previously commented out and next comment out the following line in one of the listeners in onCreate():
mCurrentIndex = (mCurrentIndex + 1) % mQuestions.length;
Now, the app shouldn't crash when we run it but the Next button doesn't do anything. Let's pretend we don't know why the button isn't working. One thing we could do is add code to log relevant information when the button is pressed.
Modify onCreate() to include the following code for the the mNextButton's listener:
public class QuizActivity extends AppCompatActivity {
    ...
    private static final String TAG = QuizActivity.class.getSimpleName();
    ...

    mNextButton.setOnClickListener(new View.OnClickListener() {
        @Override
        public void onClick(View v) {
            // mCurrentIndex = (mCurrentIndex + 1) % mQuestions.length;
            Log.d(TAG, "Next clicked: mCurrentIndex = " + mCurrentIndex);
            displayQuestion();
        }
    });

    ...
}
Before we run our app, let's create a log filter that will only show log
messages generated by code in our package and with the debug level or higher.
To do this, open the logcat window by clicking Android Monitor near the
bottom of Android Studio and then by clicking the logcat tab if it's not
selected. Near the right of the logcat window, there is a drop-down menu with
the text Show only selected application; we can create a new filter by
selecting Edit filter. Give the filter a name. set the package name to the
package you are working with (like com.arthurneuman), unselect the Regex
option, and set the log level to debug.
Now if we run the app and click the Next button, we should see log messages similar to the following:
06-30 18:45:24.450 9681-9681/com.arthurneuman.triviaquiz D/QuizActivity: Next clicked: mCurrentIndex = 0
06-30 18:45:25.265 9681-9681/com.arthurneuman.triviaquiz D/QuizActivity: Next clicked: mCurrentIndex = 0
06-30 18:45:25.993 9681-9681/com.arthurneuman.triviaquiz D/QuizActivity: Next clicked: mCurrentIndex = 0
As indicated by the log messages, the value of mCurrentIndex is not changing. We know why (because we commented out the code that increments mCurrentIndex) but often the reason isn't obvious and adding log messages can be helpful in determining what is causing unexpected behavior. We can uncomment the code to increment mCurrentIndex to fix the bug and remove the code to create a log message.
Breakpoints
Sometimes it's more useful to know the state of several objects or to
execute code line-by-line so we can examine the state of the app at each step.
Rather than creating a lot of log messages, we can make use of the debugger by
setting breakpoints in our code. A breakpoint is place in code where a
program's execution is paused until execution is resumed.
To add a breakpoint, we can left-click in the grey area immediately to the left of the line for which we'd like to pause execution.
Let's set a breakpoint at the call to displayQuestion() in the mNextButton's listener.

The red circle indicates that a breakpoint has been set. If we run our application like we have been, we won't notice anything different. To make use of the breakpoint we just set, we have to run our program with the debugger; we can do this by clicking the button next to the run button in the toolbar.
If we click the Next button, we'll see something similar to the following:
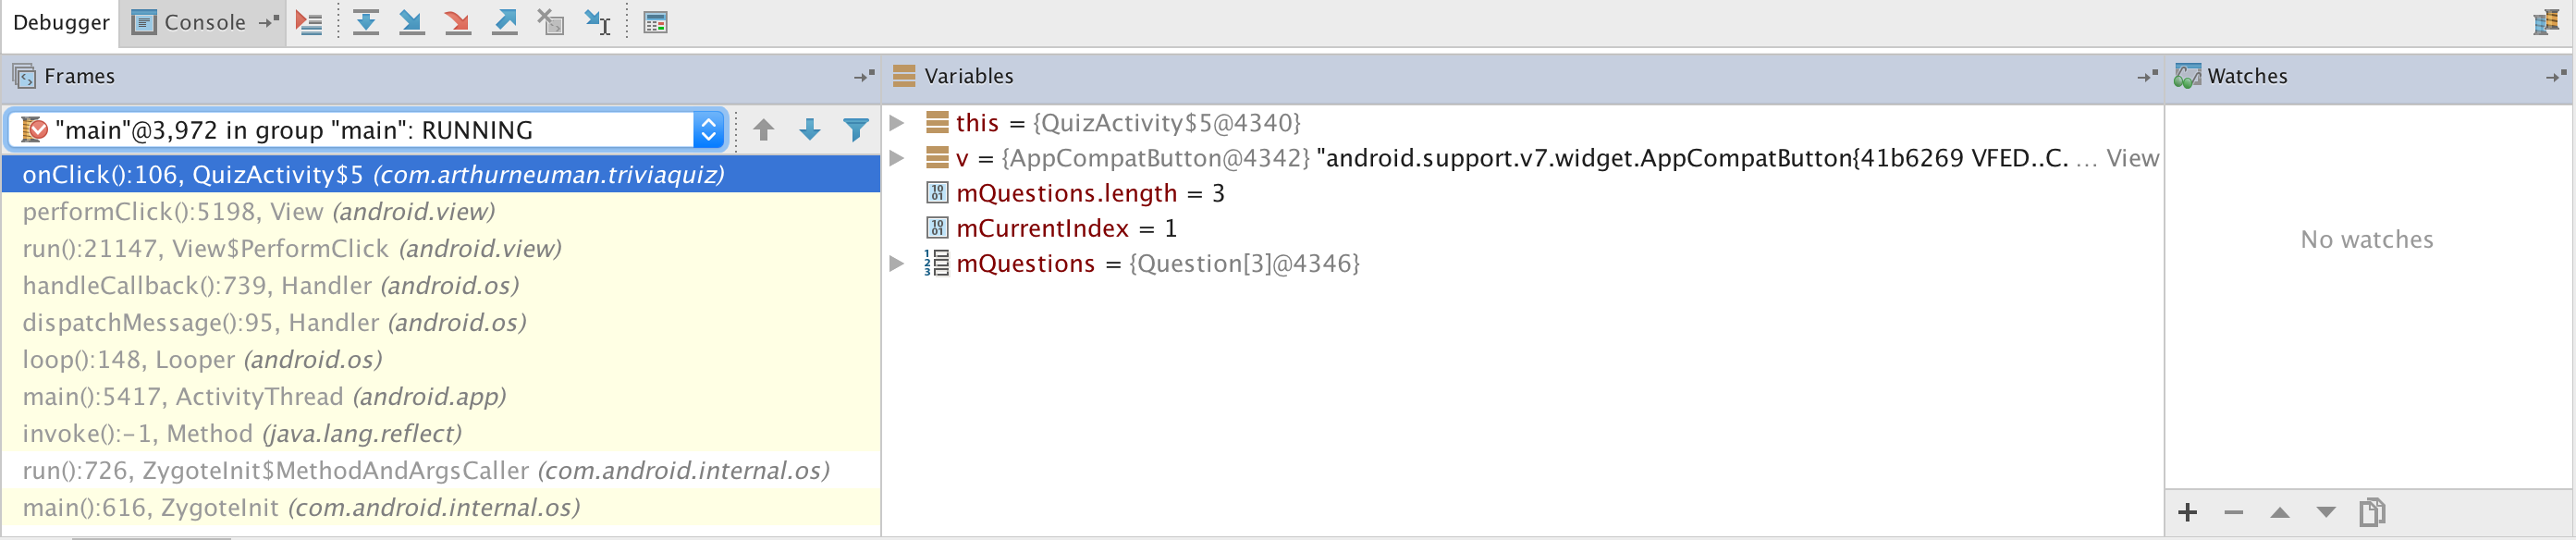
In the debug window, we can see the Frames and Variables views. The frames view lets us examine the state of different threads with the current thread selected by default. It also presents the current stack trace of the selected thread. The variables view allows us to examine variables for the selected frame in the stack trace. Notice that mCurrentIndex has been incremented which is what we'd expect prior to calling displayQuestion().
The toolbar includes some useful buttons. The Step Over button will execute the current line of code and advance to the next line. Note that at the time of this writing, there is a bug that causes the application to crash when stepping over at the end of a method; use Step Out instead.
Step Out allows us to step out of the method we're currently in to the place where it was called. Step Into allows us to move to a method being called so we can execute the method line-by-line. Run to Cursor allows us to run all code until we get to the line on which the cursor is; execution will then pause.
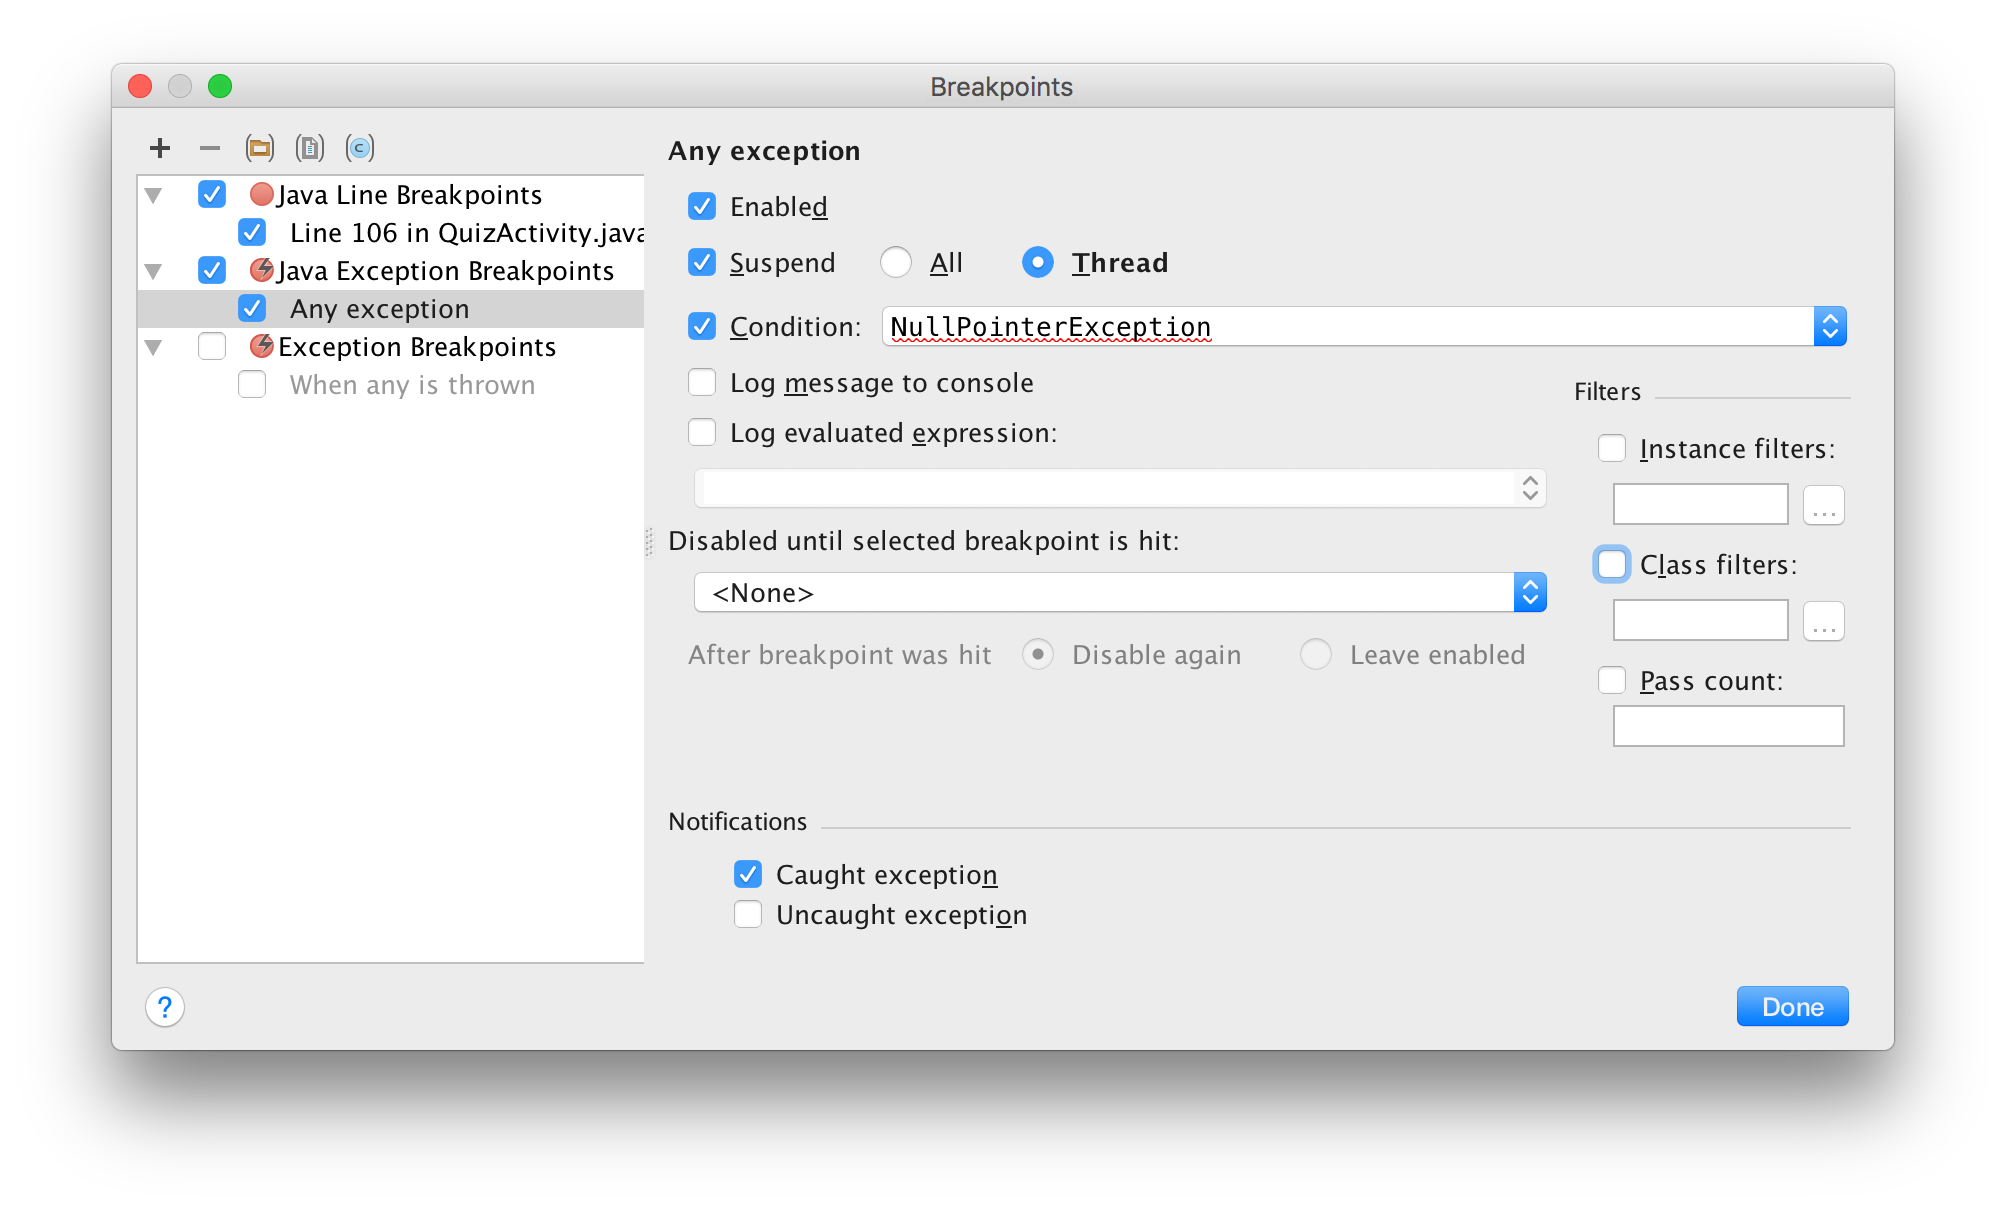
In addition to manually setting breakpoints, we can also configure exception
breakpoints that will allow us to pause execution and examine the app's state
when an exception occurs. To do this, select the View breakpoints from
the Run menu. Let's add a breakpoint exception for instances of
NullPointerException. To do this, click the Add button, select Java
Exception Breakpoints, start typing NullPointerException, select it from
the list of suggestions, and click OK.
We can comment out the following line in the onCreate() method to cause a NullPointerException to be thrown:
mNextButton = (Button) findViewById(R.id.next_button);
Now if we debug the app, we should reach a breakpoint at the call to mNextButton.setOnClickListener() because we have not assigned an object to mNextButton and we cannot call the method on null. Uncomment the previously commented line to fix this.
Android Lint
So far the debugging that we've done is no different from the debugging you might do for any Java application - and most of the time this is the kind of debugging we'll need to do. However, there are some bugs that can occur with Android-specific parts of an application (such as resources) for which the normal Java debugger might not be helpful. For these bugs, Android Lint can help detect these kinds of errors.
For example, change the following code in QuizActivity.onCreate():
mNextButton = (Button) findViewById(R.id.next_button);
to this:
mNextButton = (Button) findViewById(R.id.question_text_view);
We can view errors found by Android Lint by selecting Analyze and Inspect Code from the menu bar. Though we have the option to inspect the entire app or the current module, let's inspect the current file. In addition to some Java suggestions, we also see Android Lint messages. One of the messages indicates that there's a problem with our attempt to cast a TextView to a Button. If we try to run the app, it will crash due to an ClassCastException - the very thing Android Lint warned us about.
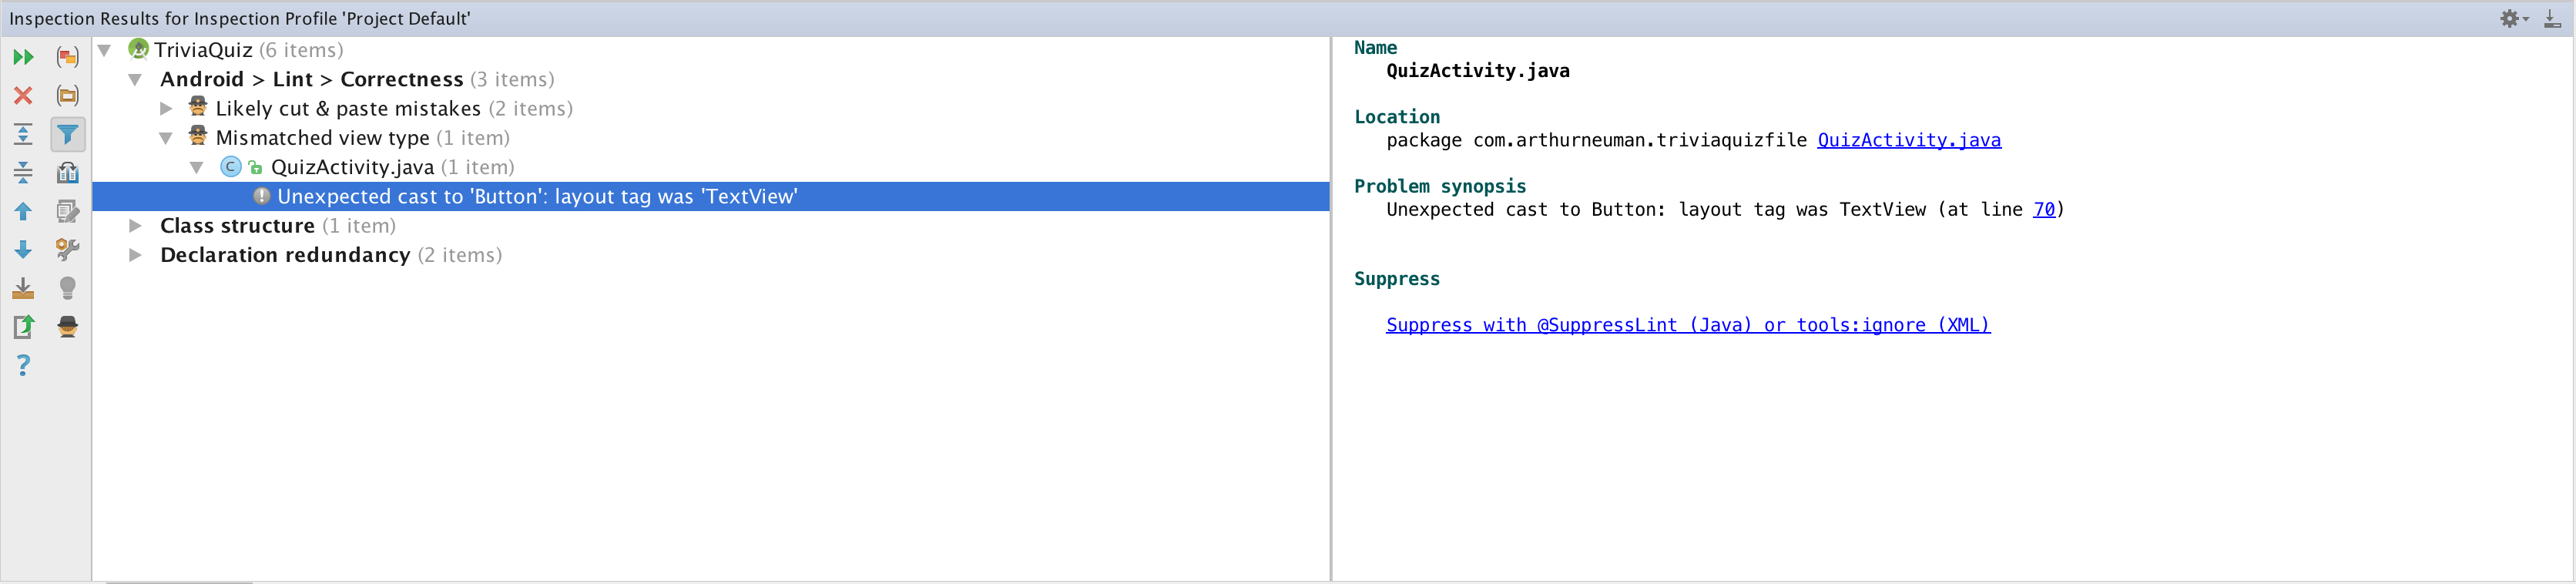
Additionally, notice that the line causing the problem is also underlined in red in the editor view. We can use Android Lint to help address issues before they cause our app to crash.
Be sure to revert your code to assign the correct view to mNextButton.
Issues with the R class
Occasionally, we'll encounter errors related to resources and the R class used to access them that seem to appear suddenly for no reason. Diagnosing these error can sometimes be frustrating. Here are some things to try.
- Check the XML in the resource files - make sure it's valid and free of errors.
- Clean the project by selecting Build and Clean Project from the menu bar. This causes Android Studio to rebuild the entire project.
- Sync Gradle by selecting Tools, Android, and Sync Project with Gradle Files. Changes to Gradle files might cause problems with until the project is synced and rebuilt.
- Run Android Lint. Android Lint can often uncover unexpected errors.
Adding a Second Activity
So far our app has one activity, QuizActivity that displays a question, four
possible answers, a next button, and a toast indicating if the answer we select
is correct or not. What if we want to display something else or ask the user
for other information? While we could add something to our existing activity,
it might make sense to make another activity and start it from QuizActivity.
As another example, suppose we have an app of Todo items where the main
activity is a list of all tasks. If we wanted to display detailed task
information, we could create a new activity.
As we go through the process of creating and using a second activity, be sure to use any of debugging tools we discussed if you run into problems.
Creating a Second Activity
When we create a new activity, we typically create two new files: a Java class
file and an XML layout file. Additionally, we have to update the Android
manifest file with information about our new activity. The manifest file
provides information about our app including the Java package, the components
of our app, permissions our app requires, and the minimum Android API version.
Misconfigured class, layout, or manifest files will cause our app to not run so
rather than create/update these files by hand, we can rely on Android Studio.
We'll create a new activity that will be used to allow the user to see a hint. Before we create a new activity, let's add strings to our string resource file:
<string name="hint_text">Are you sure you want a hint?</string>
<string name="hint_show_button">Hint</string>
<string name="hint_confirm_button">Yes</string>
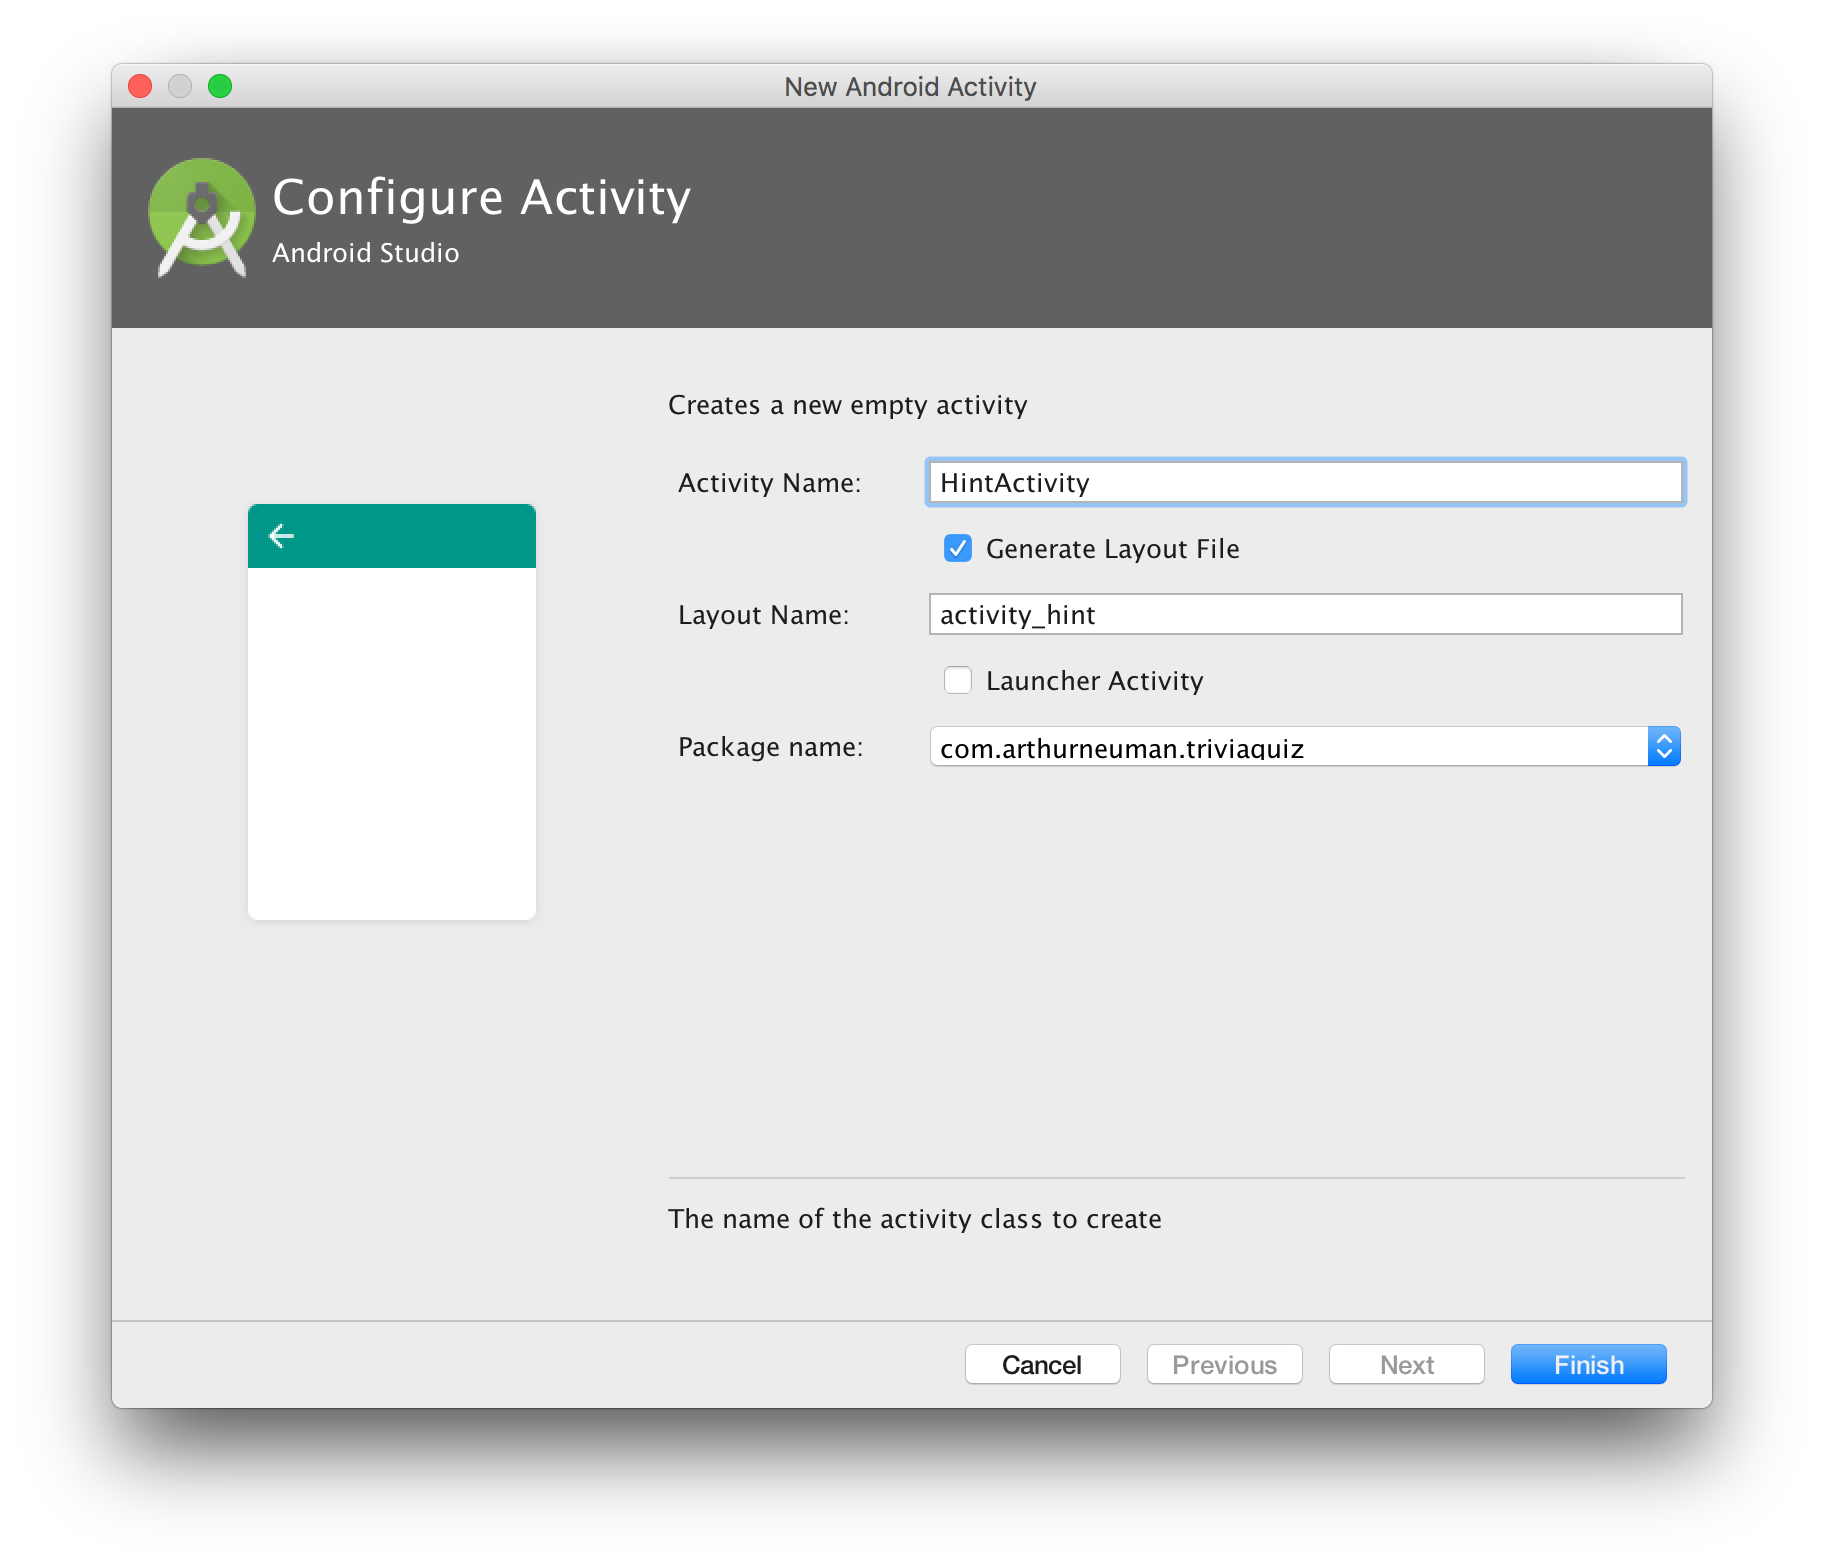
To create a new activity, right-click on your Java package in the Project view in Android Studio and select New, Activity, and Empty Activity. Configure the new activity with values similar to those pictured.
This will create a new Java class file and an XML layout file as well as
update the Android manifest file. Our new activity, will prompt the user to
confirm that they want a a hint so we'll add a LinearLayout containing two
Plain TextViews and a Button. As a first step, replace the automatically
generated RelativeLayout in the layout file with a LinearLayout. The
easiest way to do this is by modifying the XML and changing RelativeLayout.
In Design view, be sure the following properties are set on the layout:
| Property | Value |
|---|---|
| gravity | [center] |
| orientation | vertical |
In the Design view, drag and drop two Plain TextView widgets and a Button below the TextView widgets. Set the following properties:
| Object | Property | Value |
|---|---|---|
| Top TextView | id | hint_confirm_textview |
| Top TextView | text | @string/hint_confirm_text |
| Top TextView | padding | 24dp |
| Middle TextView | id | hint_textview |
| Middle TextView | text | |
| Middle TextView | padding | 24dp |
| Button | id | hint_confirm_button |
| Button | text | @string/hint_confirm_button |
The XML for the new layout should be similar to the following:
<?xml version="1.0" encoding="utf-8"?>
<LinearLayout
    xmlns:android="http://schemas.android.com/apk/res/android"
    xmlns:tools="http://schemas.android.com/tools"
    android:layout_width="match_parent"
    android:layout_height="match_parent"
    tools:context="com.arthurneuman.triviaquiz.HintActivity"
    android:orientation="vertical"
    android:gravity="center">


    <TextView
        android:layout_width="wrap_content"
        android:layout_height="wrap_content"
        android:text="@string/hint_confirm_text"
        android:id="@+id/hint_confirm_textview"
        android:layout_gravity="center_horizontal"
        android:padding="24dp"/>

    <TextView
        android:layout_width="wrap_content"
        android:layout_height="wrap_content"
        android:id="@+id/hint_textview"
        android:layout_gravity="center_horizontal"
        android:padding="24dp"/>

    <Button
        android:layout_width="wrap_content"
        android:layout_height="wrap_content"
        android:text="@string/hint_confirm_button"
        android:id="@+id/hint_confirm_button"
        android:layout_gravity="center_horizontal"
        />
</LinearLayout>
While we're working on layouts, let's update the activity_quiz.xml layout
to place a button next to the Next button. First, change the following
properties of the Next button:
| Property | Value |
|---|---|
| column | 2 |
| columnSpan | 1 |
Next, drag a Button next to the Next button and set the following properties:
| Property | Value |
|---|---|
| column | 1 |
| columnSpan | 1 |
| layout:gravity | [center horizontal] |
| layout:row | 2 |
| id | hint_show_button |
| text | @string/hint_show_button |
The XML for activity_quiz.xml should now be similar to
<?xml version="1.0" encoding="utf-8"?>
<LinearLayout xmlns:android="http://schemas.android.com/apk/res/android"
    android:layout_width="match_parent"
    android:layout_height="match_parent"
    android:gravity="center"
    android:orientation="vertical" >

    <TextView
        android:layout_width="wrap_content"
        android:layout_height="wrap_content"
        android:id="@+id/question_text_view"
        android:layout_gravity="center_horizontal"
        android:padding="24dp" />

    <GridLayout
        android:layout_width="wrap_content"
        android:layout_height="wrap_content"
        android:layout_gravity="center_horizontal"
        android:columnCount="3">

        <Button
            android:layout_width="wrap_content"
            android:layout_height="wrap_content"
            android:id="@+id/option_1_button"
            android:layout_gravity="center_horizontal"
            android:layout_row="0"
            android:layout_column="1"/>

        <Button
            android:layout_width="wrap_content"
            android:layout_height="wrap_content"
            android:id="@+id/option_2_button"
            android:layout_gravity="center_horizontal"
            android:layout_row="0"
            android:layout_column="2"/>

        <Button
            android:layout_width="wrap_content"
            android:layout_height="wrap_content"
            android:id="@+id/option_3_button"
            android:layout_gravity="center_horizontal"
            android:layout_row="1"
            android:layout_column="1"/>

        <Button
            android:layout_width="wrap_content"
            android:layout_height="wrap_content"
            android:id="@+id/option_4_button"
            android:layout_gravity="center_horizontal"
            android:layout_row="1"
            android:layout_column="2"/>

        <Button
            android:layout_width="wrap_content"
            android:layout_height="wrap_content"
            android:text="@string/hint_show_button"
            android:id="@+id/hint_show_button"
            android:layout_row="2"
            android:layout_column="1"
            android:layout_columnSpan="1"
            android:layout_gravity="center_horizontal"/>

        <Button
            android:layout_width="wrap_content"
            android:layout_height="wrap_content"
            android:text="@string/next_button"
            android:id="@+id/next_button"
            android:layout_gravity="center_horizontal"
            android:layout_columnSpan="1"
            android:layout_row="2"
            android:layout_column="2"/>

    </GridLayout>

</LinearLayout>
The layouts should look similar to the following:
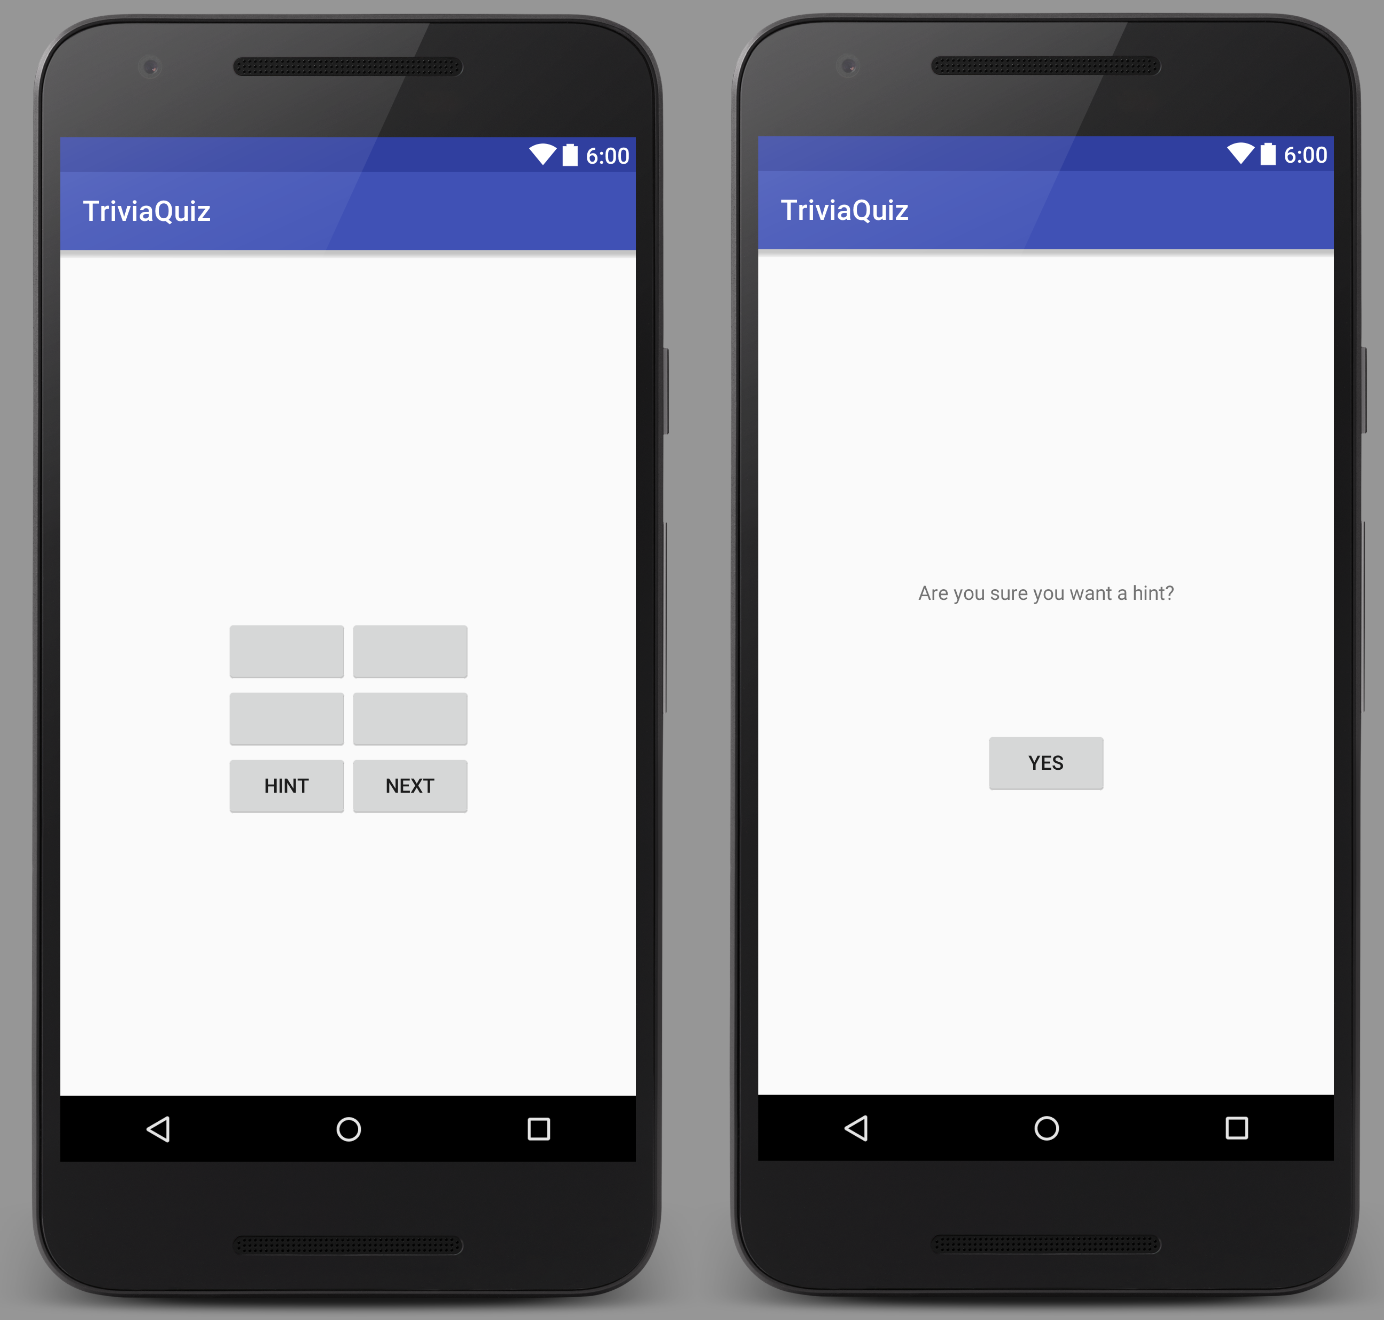
Now that we've created the layout, we can add functionality by adding code to the Java class files.
To start an activity from within another activity, we'll make use of the ActivityManager. The ActivityManager is part of the Android OS that, as its name suggests, manages activities - it can be used to get information about running activities as well to start new activities. We can instruct the ActivityManager to create a new activity by calling startActivity() from within an existing activity. The startActivity() method is a member of the abstract class Context which provides information about an application and its environment; Activity is a subclass of Context so QuizActivity has a startActivity() method.
The startActivity() method is overloaded with the following signatures:
startActivity(Intent)
startActivity(Intent, Bundle)
For now, we'll work with the method that takes an Intent parameter. An Intent is an object used to communicate with the OS. We'll use an Intent to pass information to the new activity we want the OS to create. The Intent class has several constructors, we'll make use of the constructor that takes a Context and a Class as parameters; the Class parameter specifies the Activity class to be started and the Context parameter specifies which application the class is associated with.
To start the HintActivity from QuizActivity, we could use the following:
Intent intent = new Intent(this, HintActivity.class);
startActivity(intent);
Before we add the code to create the new activity to QuizActivity, let's add a field for the hint_show_button to the QuizActivity class:
QuizActivity.java
private Button mShowHintButton;
Let's also assign a value to mShowHintButton in the QuizActivity.onCreate() method:
mShowHintButton = (Button) findViewById(R.id.hint_show_button);
Now, we can assign a listener to the button in QuizActivity.onCreate():
QuizActivity.java
mShowHintButton.setOnClickListener(new View.OnClickListener() {
    @Override
    public void onClick(View v) {
        Intent intent = new Intent(QuizActivity.this, HintActivity.class);
        startActivity(intent);
    }
});
If we run the app now, we can click the Hint button and we'll see the hint activity. We haven't added any functionality to HintActivity so we can't do much yet. We'd like to be able to display the correct answer if the user wants a hint. To do that, we'll have to communicate that as part of the Intent used to create the hint activity. To add extra information, we can make use of Intent extras. Using an Intent extra is similar to using a bundle: we can use the putExtra() method to add a name/value pair as extra information to the intent. putExtra() is overridden to support many data types but we'll make use of method that allows us to store a string.
Rather than adding this code to QuizActivity, it makes more sense to add it to HintActivity since the intent is being used to start the Hint activity and the intent extra will be used by HintActivity. We'll create a static method in HintActivity that takes two arguments, a Context and a String, and returns a new Intent with an extra. In addition to the new static method, we'll also create a static field to store the extra's name.
HintActivity.java
private static final String ANSWER = "com.arthurneuman.triviaquiz.answer";

public static Intent newIntent(Context context, String answer) {
    Intent intent = new Intent(context, HintActivity.class);
    intent.putExtra(ANSWER, answer);
    return intent;
}
Now, we can update mShowHintButton's OnClickListener in QuizActivity to use HintActivity.newIntent():
QuizActivity.java
mShowHintButton.setOnClickListener(new View.OnClickListener() {
    @Override
    public void onClick(View v) {
        // get the correct answer
        Question currentQuestion = mQuestions[mCurrentIndex];
        String[] answers = getResources().getStringArray(
                currentQuestion.getQuestionResId());
        String answer = answers[currentQuestion.getCorrectAnswer()];

        // start HintActivity with correct answer
        Intent intent = HintActivity.newIntent(QuizActivity.this, answer);
        startActivity(intent);
    }
});
This allows us to share information between activities: when we start
HintActivity, information about the correct answer is sent from
QuizActivity. To use this information in HintActivity, we can call the
Activity.getIntent() method to access the intent that started the activity.
Let's add a field to HintActivity to store the answer and add code to
onCreate() to extract the answer from the intent.
HintActivity.java
public class HintActivity extends AppCompatActivity {

    private static final String ANSWER = "com.arthurneuman.triviaquiz.answer";
    private String mCorrectAnswer;

    public static Intent newIntent(Context context, String answer) {
        Intent intent = new Intent(context, HintActivity.class);
        intent.putExtra(ANSWER, answer);
        return intent;
    }

    @Override
    protected void onCreate(Bundle savedInstanceState) {
        super.onCreate(savedInstanceState);
        setContentView(R.layout.activity_hint);
        mCorrectAnswer = getIntent().getStringExtra(ANSWER);
    }

}
Finally, we can add code to display the answer when the hint_show_button is pressed.
HintActivity.java
public class HintActivity extends AppCompatActivity {

    ...
    private String mCorrectAnswer;
    private TextView mHintTextView;
    private Button mConfirmButton;
    ...

    @Override
    protected void onCreate(Bundle savedInstanceState) {
        super.onCreate(savedInstanceState);
        setContentView(R.layout.activity_hint);
        mCorrectAnswer = getIntent().getStringExtra(ANSWER);

        mHintTextView = (TextView) findViewById(R.id.hint_textview);
        mConfirmButton = (Button) findViewById(R.id.hint_confirm_button);

        mConfirmButton.setOnClickListener(new View.OnClickListener() {
            @Override
            public void onClick(View v) {
                mHintTextView.setText(mCorrectAnswer);
            }
        });
    }

}
Note that part of the code for HintActivity has been excluded from the above code and is represented by the ellipses (...).
If we run the app, we can press the Hint button to start the hint activity. In the hint activity, we can press the Yes button to see the correct answer. We can use Android's back button to return to the previous activity.
The code for our two activities should look similar to this:
QuizActivity.java
public class QuizActivity extends AppCompatActivity {
    private static final String TAG = QuizActivity.class.getSimpleName();
    private static final String KEY_INDEX = "index";

    private Button mOption1Button;
    private Button mOption2Button;
    private Button mOption3Button;
    private Button mOption4Button;
    private Button mNextButton;
    private Button mShowHintButton;

    private TextView mQuestionTextView;

    int mCurrentIndex = 0;

    private Question[] mQuestions = new Question[] {
            new Question(R.array.question_1, 3),
            new Question(R.array.question_2, 3),
            new Question(R.array.question_3, 1)
    };

    private void displayQuestion() {
        Question currentQuestion = mQuestions[mCurrentIndex];
        String[] questionText = getResources()
                .getStringArray(currentQuestion.getQuestionResId());
        mQuestionTextView.setText(questionText[0]);
        mOption1Button.setText(questionText[1]);
        mOption2Button.setText(questionText[2]);
        mOption3Button.setText(questionText[3]);
        mOption4Button.setText(questionText[4]);
    }

    private void checkAnswer(int buttonClicked) {
        Question currentQuestion = mQuestions[mCurrentIndex];
        if (currentQuestion.getCorrectAnswer() == buttonClicked) {
            Toast.makeText(QuizActivity.this, R.string.toast_correct,
                    Toast.LENGTH_SHORT).show();
        }
        else {
            Toast.makeText(QuizActivity.this, R.string.toast_incorrect,
                    Toast.LENGTH_SHORT).show();
        }
    }

    @Override
    protected void onCreate(Bundle savedInstanceState) {
        super.onCreate(savedInstanceState);

        if (savedInstanceState != null) {
            mCurrentIndex = savedInstanceState.getInt(KEY_INDEX, 0);
        }

        setContentView(R.layout.activity_quiz);

        mOption1Button = (Button) findViewById(R.id.option_1_button);
        mOption2Button = (Button) findViewById(R.id.option_2_button);
        mOption3Button = (Button) findViewById(R.id.option_3_button);
        mOption4Button = (Button) findViewById(R.id.option_4_button);
        mNextButton = (Button) findViewById(R.id.next_button);
        mShowHintButton = (Button) findViewById(R.id.hint_show_button);
        mQuestionTextView = (TextView) findViewById(R.id.question_text_view);


        displayQuestion();

        mOption1Button.setOnClickListener(new View.OnClickListener() {
            @Override
            public void onClick(View v) {
                checkAnswer(1);
            }
        });

        mOption2Button.setOnClickListener(new View.OnClickListener() {
            @Override
            public void onClick(View v) {
                checkAnswer(2);
            }
        });

        mOption3Button.setOnClickListener(new View.OnClickListener() {
            @Override
            public void onClick(View v) {
                checkAnswer(3);
            }
        });

        mOption4Button.setOnClickListener(new View.OnClickListener() {
            @Override
            public void onClick(View v) {
                checkAnswer(4);
            }
        });

        mNextButton.setOnClickListener(new View.OnClickListener() {
            @Override
            public void onClick(View v) {
                mCurrentIndex = (mCurrentIndex + 1) % mQuestions.length;
                displayQuestion();
            }
        });

        mShowHintButton.setOnClickListener(new View.OnClickListener() {
            @Override
            public void onClick(View v) {
                // get the correct answer
                Question currentQuestion = mQuestions[mCurrentIndex];
                String[] answers = getResources().getStringArray(
                        currentQuestion.getQuestionResId());
                String answer = answers[currentQuestion.getCorrectAnswer()];

                // start HintActivity with correct answer
                Intent intent = HintActivity.newIntent(QuizActivity.this, answer);
                startActivity(intent);
            }
        });

    }

    @Override
    public void onSaveInstanceState(Bundle savedInstanceState) {
        super.onSaveInstanceState(savedInstanceState);
        savedInstanceState.putInt(KEY_INDEX, mCurrentIndex);
    }
}
HintActivity.java
public class HintActivity extends AppCompatActivity {

    private static final String ANSWER = "com.arthurneuman.triviaquiz.answer";
    private String mCorrectAnswer;
    private TextView mHintTextView;
    private Button mConfirmButton;

    public static Intent newIntent(Context context, String answer) {
        Intent intent = new Intent(context, HintActivity.class);
        intent.putExtra(ANSWER, answer);
        return intent;
    }

    @Override
    protected void onCreate(Bundle savedInstanceState) {
        super.onCreate(savedInstanceState);
        setContentView(R.layout.activity_hint);
        mCorrectAnswer = getIntent().getStringExtra(ANSWER);

        mHintTextView = (TextView) findViewById(R.id.hint_textview);
        mConfirmButton = (Button) findViewById(R.id.hint_confirm_button);

        mConfirmButton.setOnClickListener(new View.OnClickListener() {
            @Override
            public void onClick(View v) {
                mHintTextView.setText(mCorrectAnswer);
            }
        });
    }

}